

Design a highly scalable 3-tier architecture in AWS
How to build a 3-tier architecture on AWS that is highly available, highly scalable and fault-tolerant


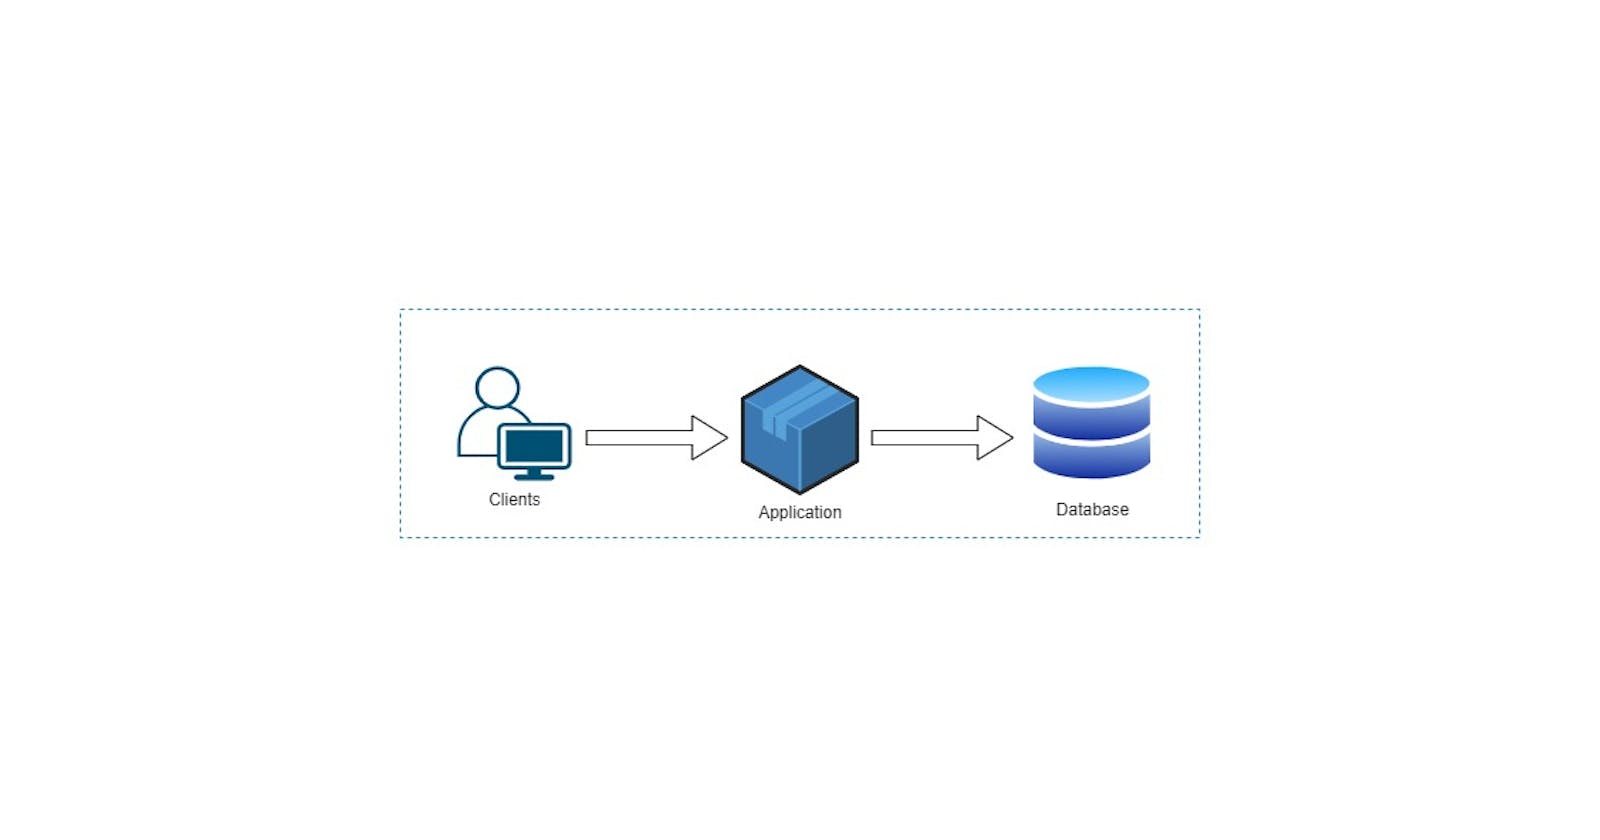
Table of contents
Welcome back to my blog. Today we will be designing a 3-tier architecture on AWS.
First, what is a 3-tier architecture?
A 3-tier architecture is a software design pattern that divides an application into three separate layers or tiers: presentation layer, business logic layer, and data storage layer. The presentation layer handles user interaction and displays information to the user. The business logic layer implements the application's functionality and processes user requests. The data storage layer manages data storage and retrieval from databases or other data sources.
This architecture promotes modularization, scalability, and separation of workload and enhances security at each level.
Note: Try to complete this task in a day to reduce any cost that might occur, and delete resources immediately
Let's skip the talks and get into it.
Stage 1
VPC
Amazon Virtual Private Cloud (Amazon VPC) gives you full control over your virtual networking environment, including resource placement, connectivity, and security.
Creating your VPC
Sign into your AWS management console, search for VPC in the space bar, and click on 'Your VPC' at the left corner of the console, then click on Create VPC.
AWS management console => VPC => Your VPC =>Create VPC
Notice you already have one default VPC created for you by AWS, you can use this but you're going to create your own.
Check the region and ensure you're in a region that's best for your use case. check here to see what to Consider when Selecting a Region for your Workload. But for this project, I will be using US East (N. Virginia) (us-east-1).
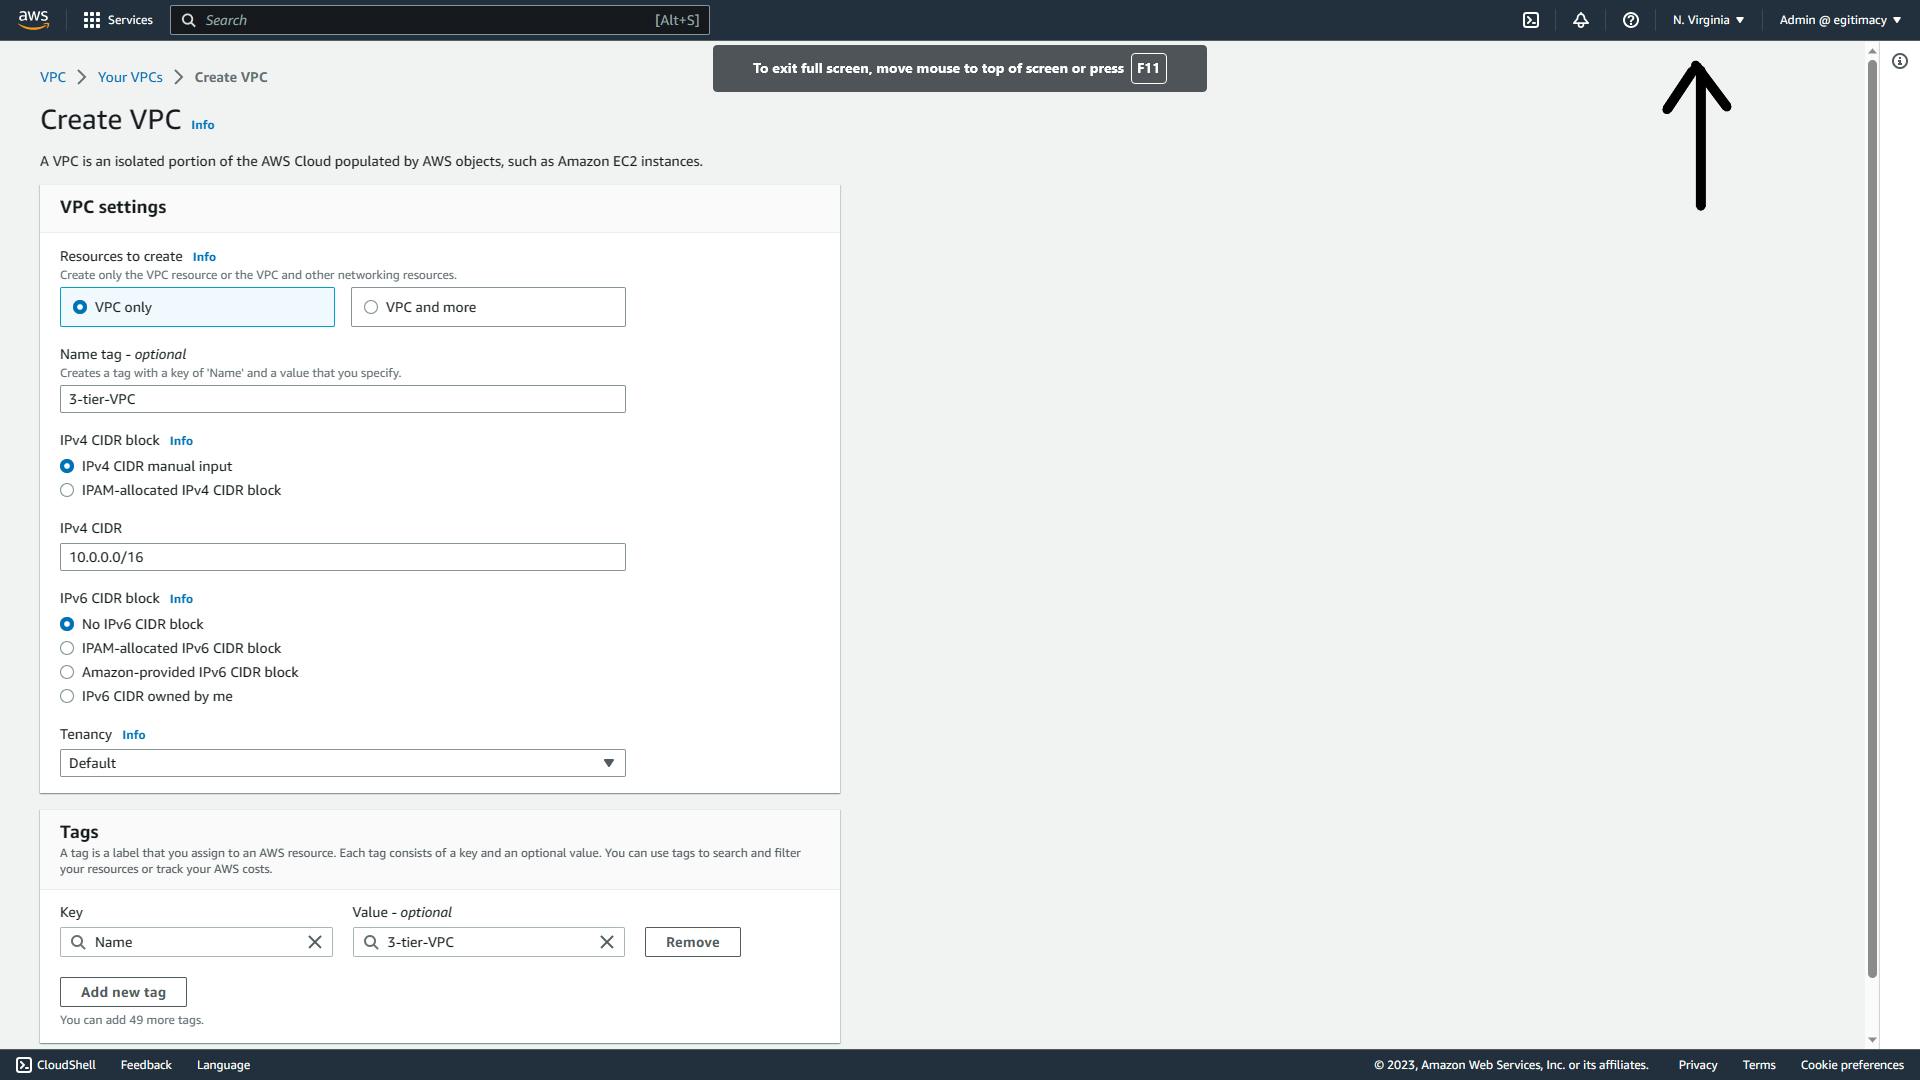
On the Create VPC Page, leave it as VPC only, we are going to be creating the other components one after the other.
Give it a name, I will be using 3-tier-VPC
On the CIDR input 10.0.0.0/16
Leave every other thing as default including Tenancy (you do not want to wake up to AWS banging on your door because of high bills, lol)
Click Create......
Go back to 'Your VPC' you should see your newly created VPC
Subnet
A subnet is a way we group resources within a VPC. They are a subset of the VPC. Subnetting allows for better management and organization of network resources, improved security, and efficient utilization of IP addresses.
Creating Your Subnets
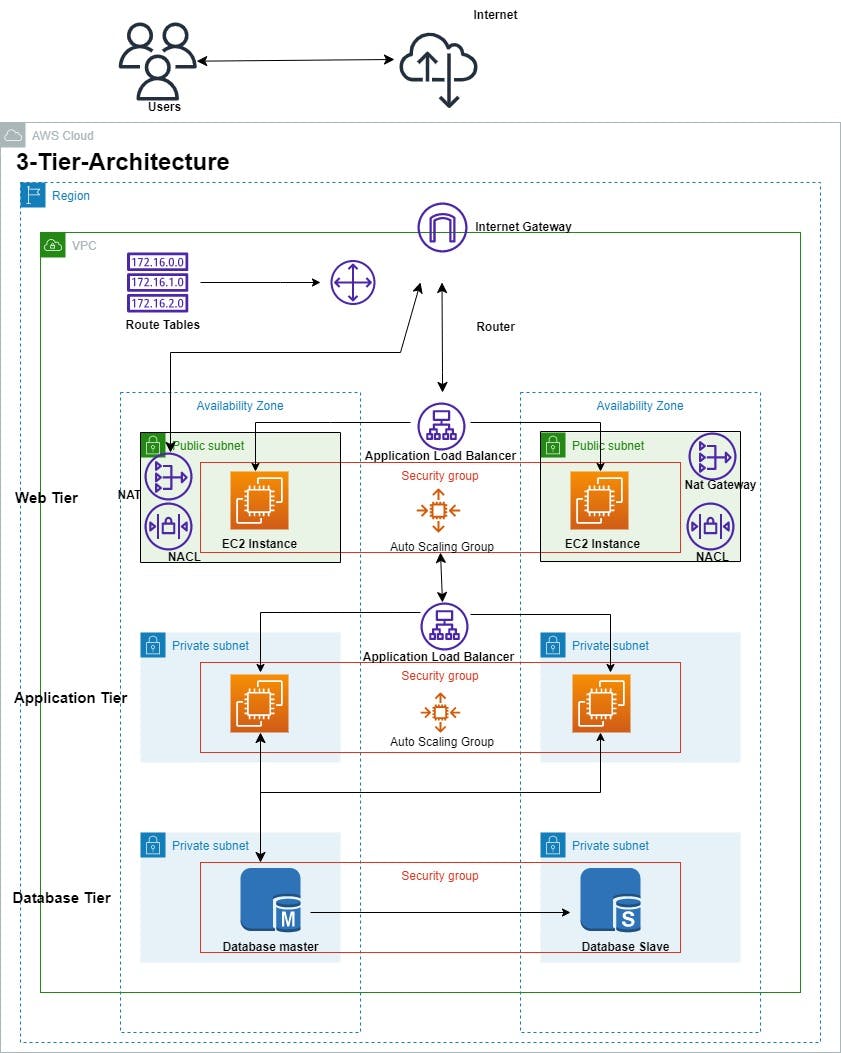
We would be creating 2 Public subnets and 4 Private subnets
The Public subnet will be used for the Web tier while 2 private subnets will be used for the Application tier and the last 2 private subnets will be used for the database layer.
The subnet will be created within 2 Availability Zone, this helps improve the availability of our architecture so that if one AZ goes down the other one will still be available.
Let's get to it!
Click on 'Subnets' and you will see that you already have some subnets created for you by AWS. They are linked to the Default VPC I mentioned earlier, but we will be creating 6 new subnets for our VPC. Click on Create a subnet, we will be creating all 6 subnets at a go.
Subnets => Create subnet => select VPC
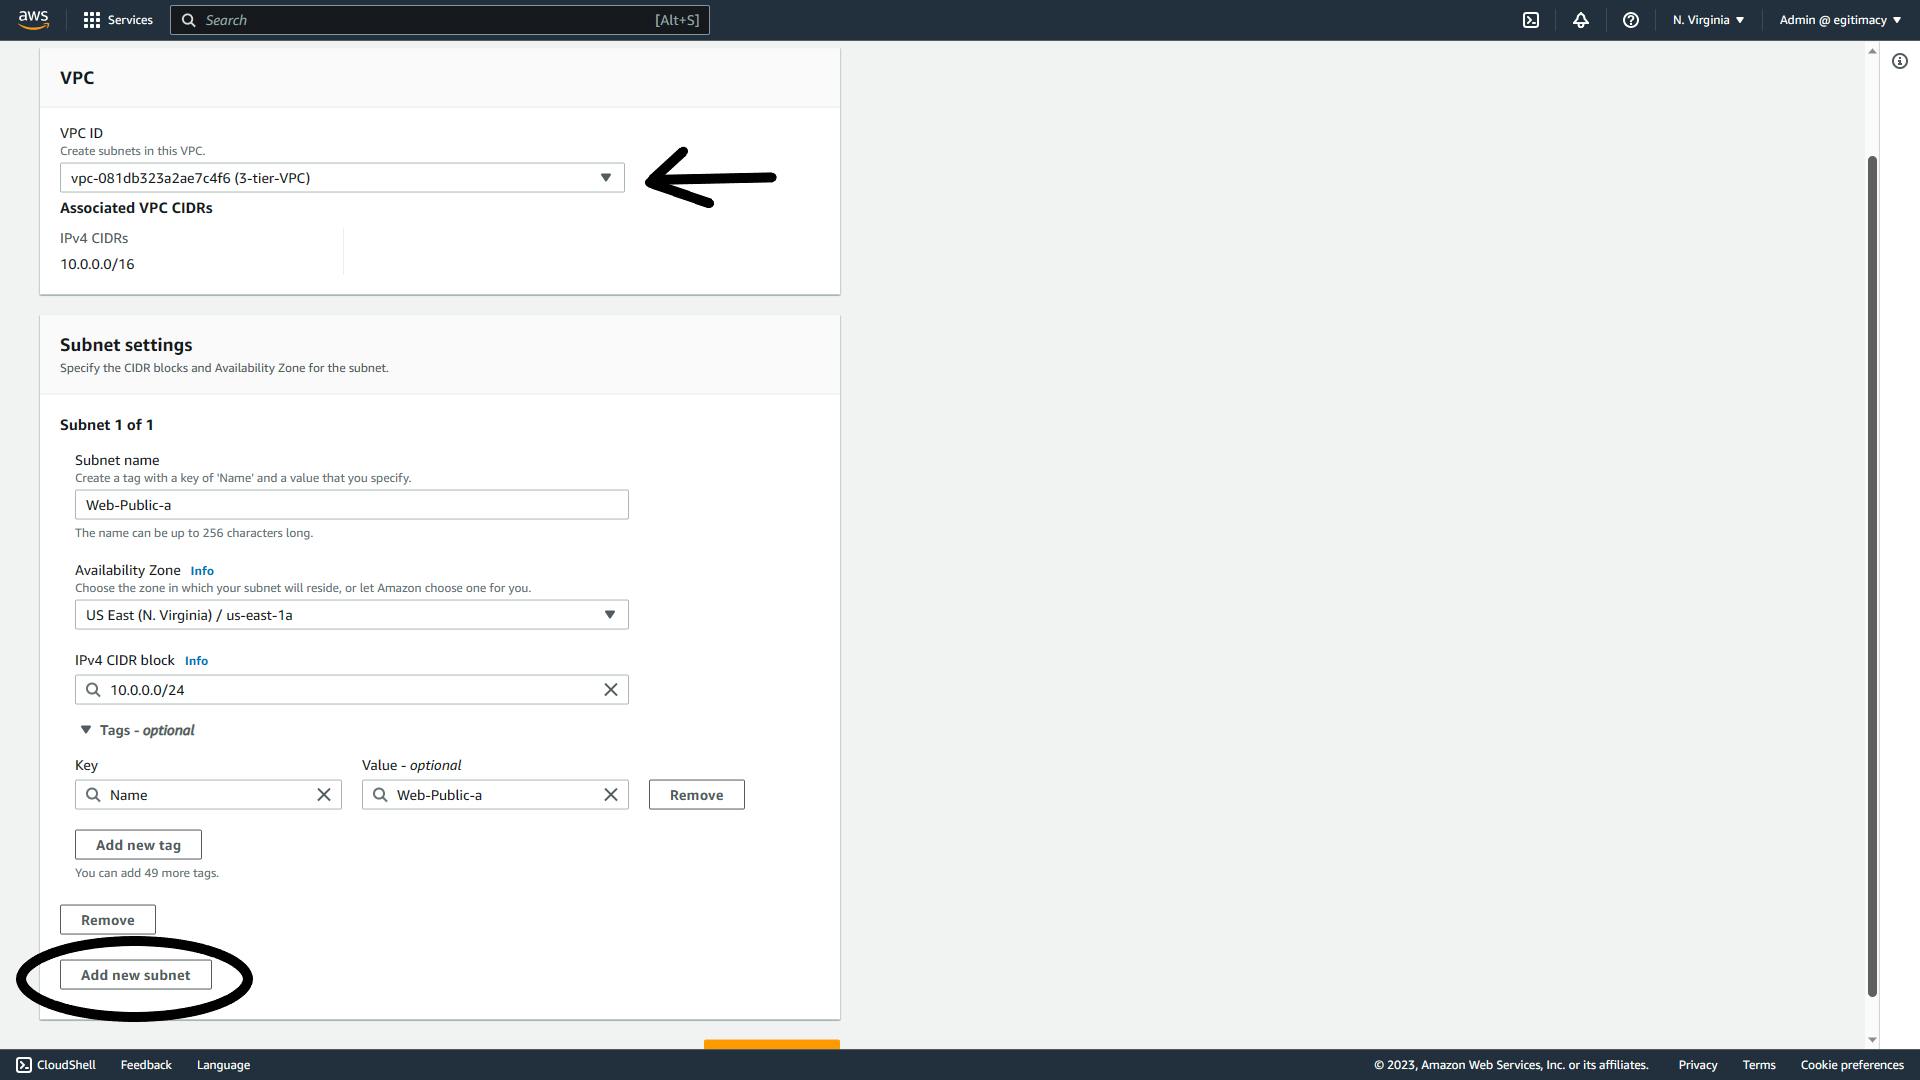
Select the VPC we just created.
Give the subnet a name, mine is 'Web-Public-a'
Availability Zone is 'us-east-1a' (You might need to pick one based on available AZ in your selected region)
Input 10.0.0.0/24 for the CIDR block (Remember, subnets are a subnetwork/subset of the VPC)
Click on 'Add new subnet' to add more subnets.
We will be adding the other subnets as follows
Name Web-Public-b, Availablity Zone us-east-1b, CIDR 10.0.1.0/24
Name Application-Private-a, Availablity Zone us-east-1a, CIDR 10.0.2.0/24
Name Application-Private-b, Availablity Zone us-east-1b, CIDR 10.0.3.0/24
Name Database-Private-a, Availablity Zone us-east-1a, CIDR 10.0.4.0/24
Name Database-Private-b, Availablity Zone us-east-1b, CIDR 10.0.5.0/24
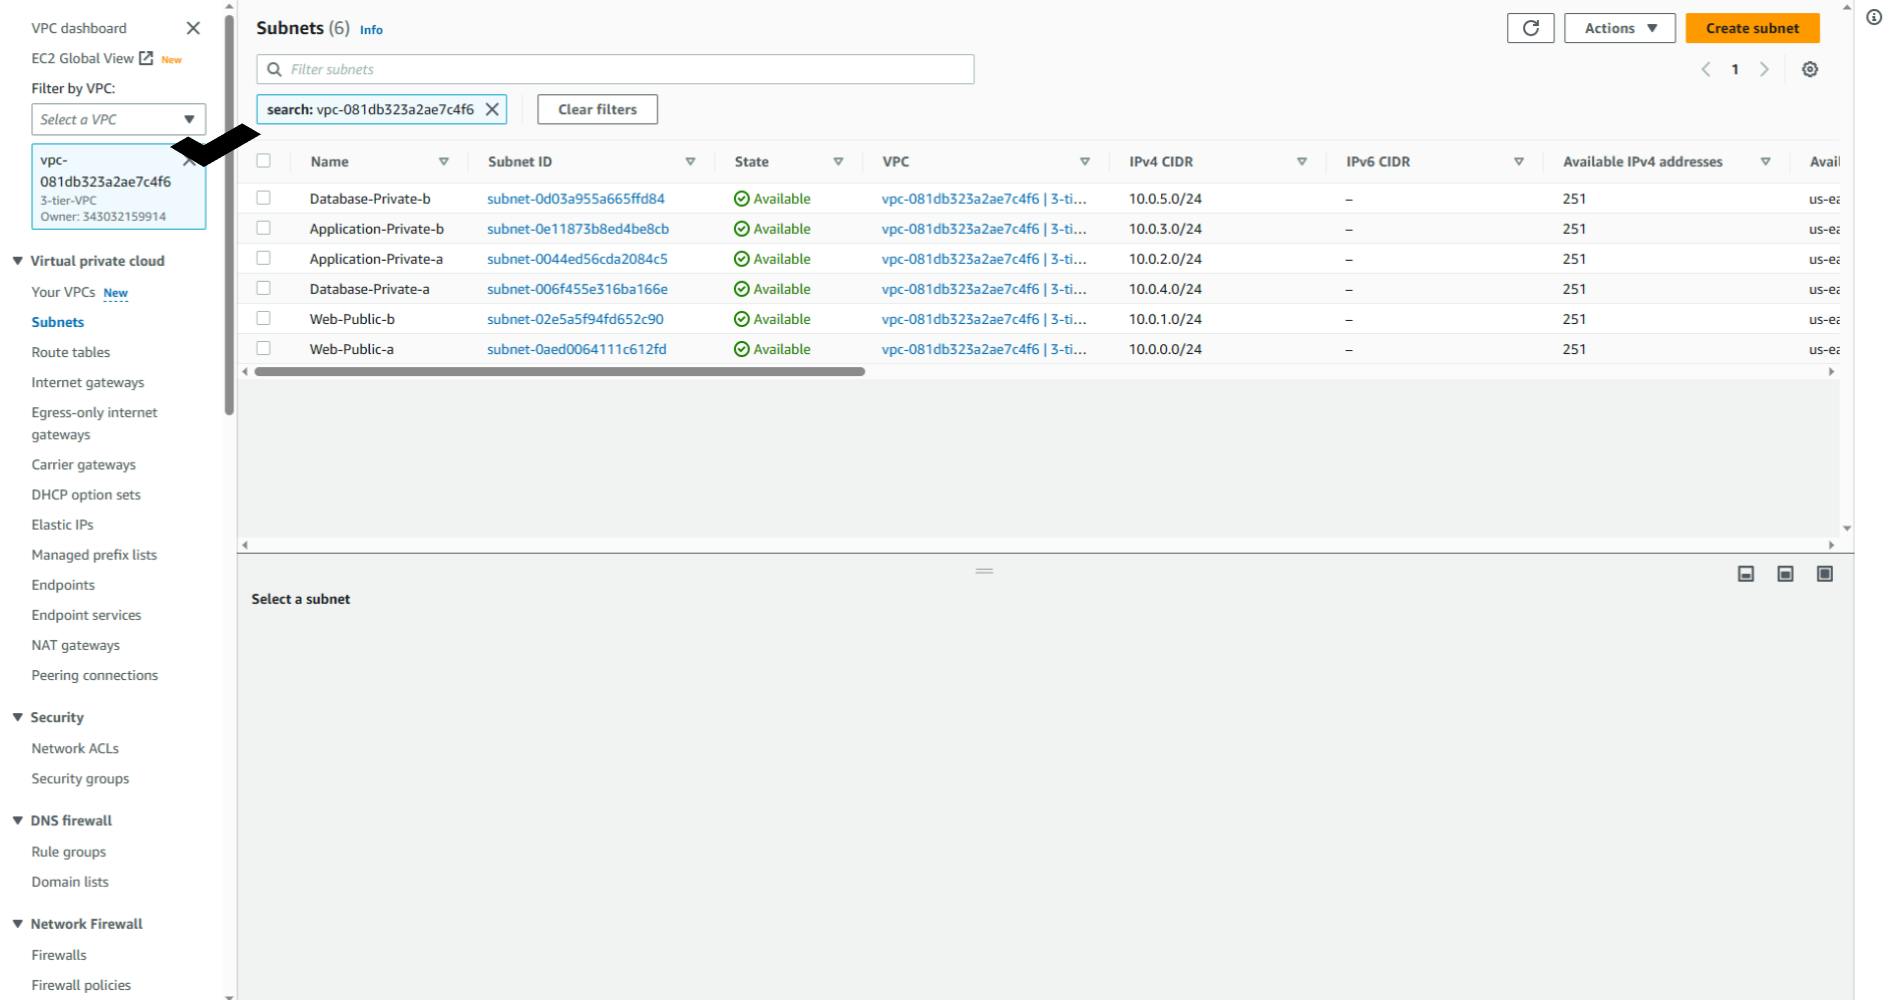
To filter your view, click on the drop-down in the left corner and select the VPC we just created. You should have this view.
After creating the subnets, you need to enable auto-assign Public IPV4 address on your web-tiers, this can also be done manually at the point of creating an EC2 instance, but it is better to enable it automatically.
Click on Web-Public-a => Actions => Edit subnet settings => Enable auto-assign IPV4 => Save
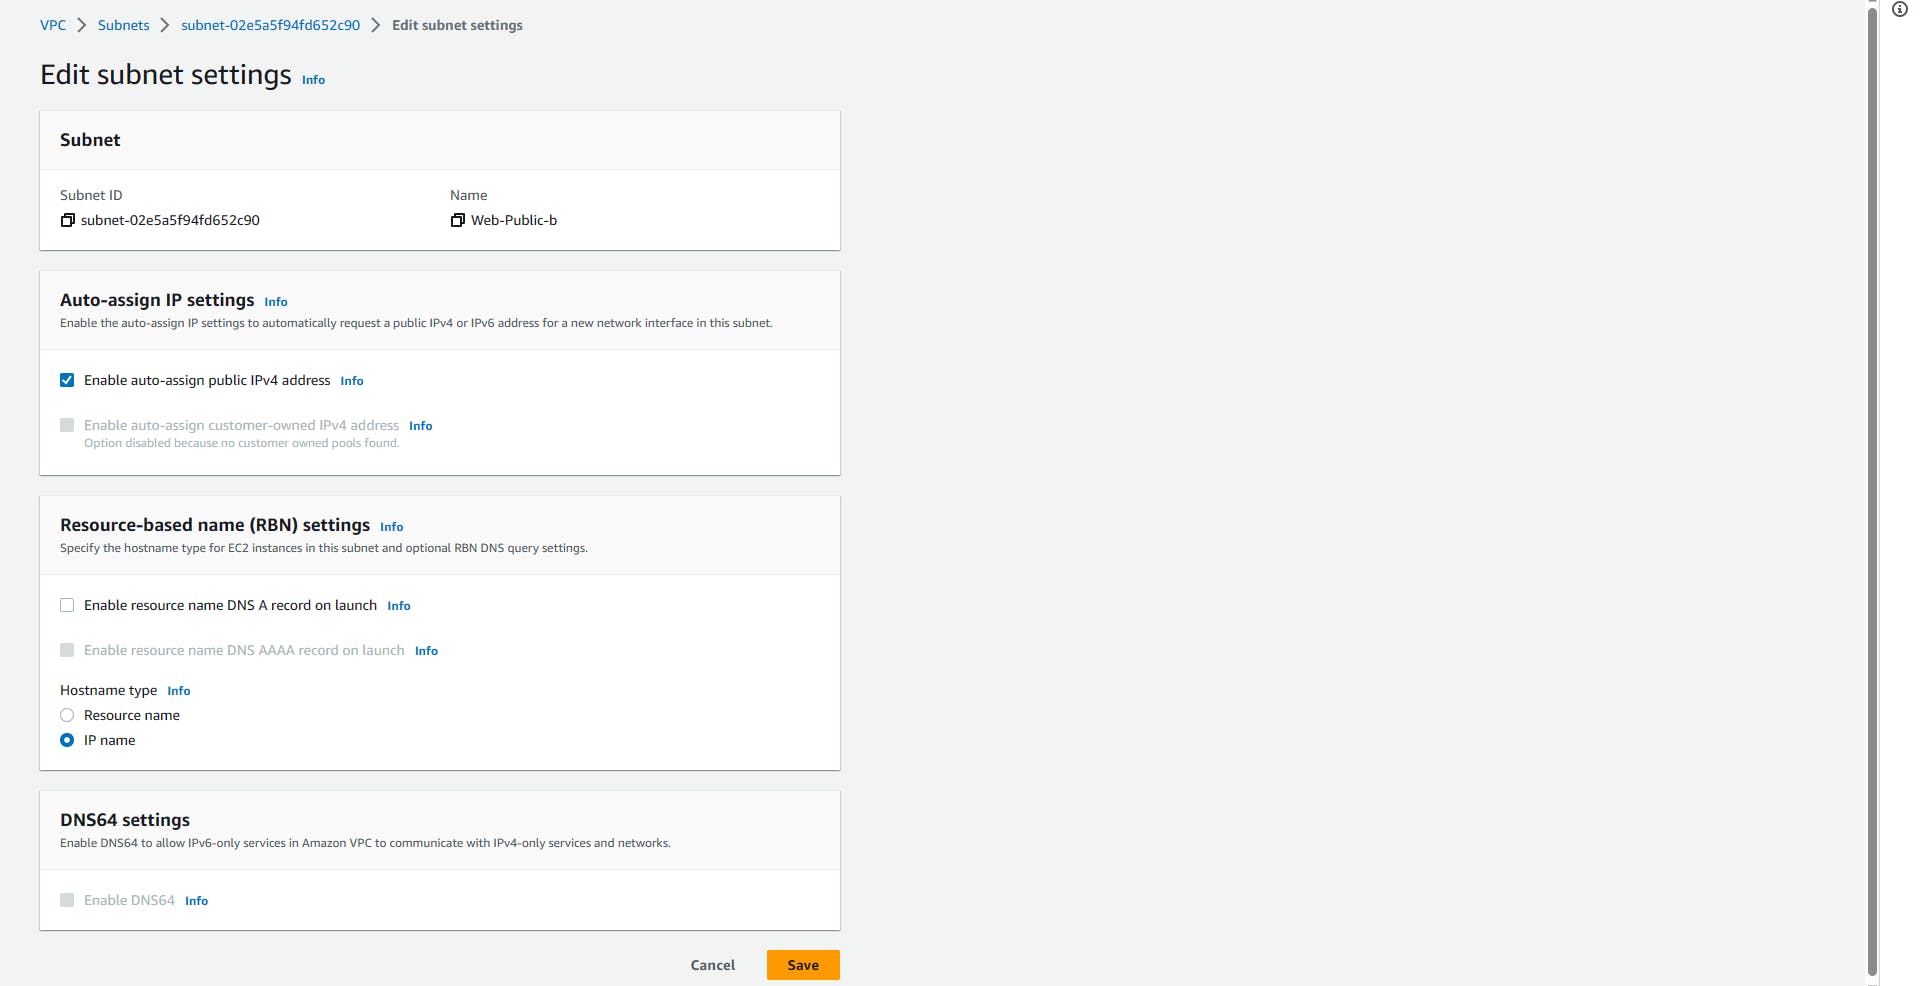
Repeat this step for the Web-Public-b too, because they are public subnets.
Internet Gateway
Internet Gateway (IGW) serves as the entry and exit point for network traffic between a private network (such as a virtual private cloud or VPC) and the public internet. The IGW allows EC2 instances that will be deployed in our VPC to communicate with the internet.
Creating Internet Gateway
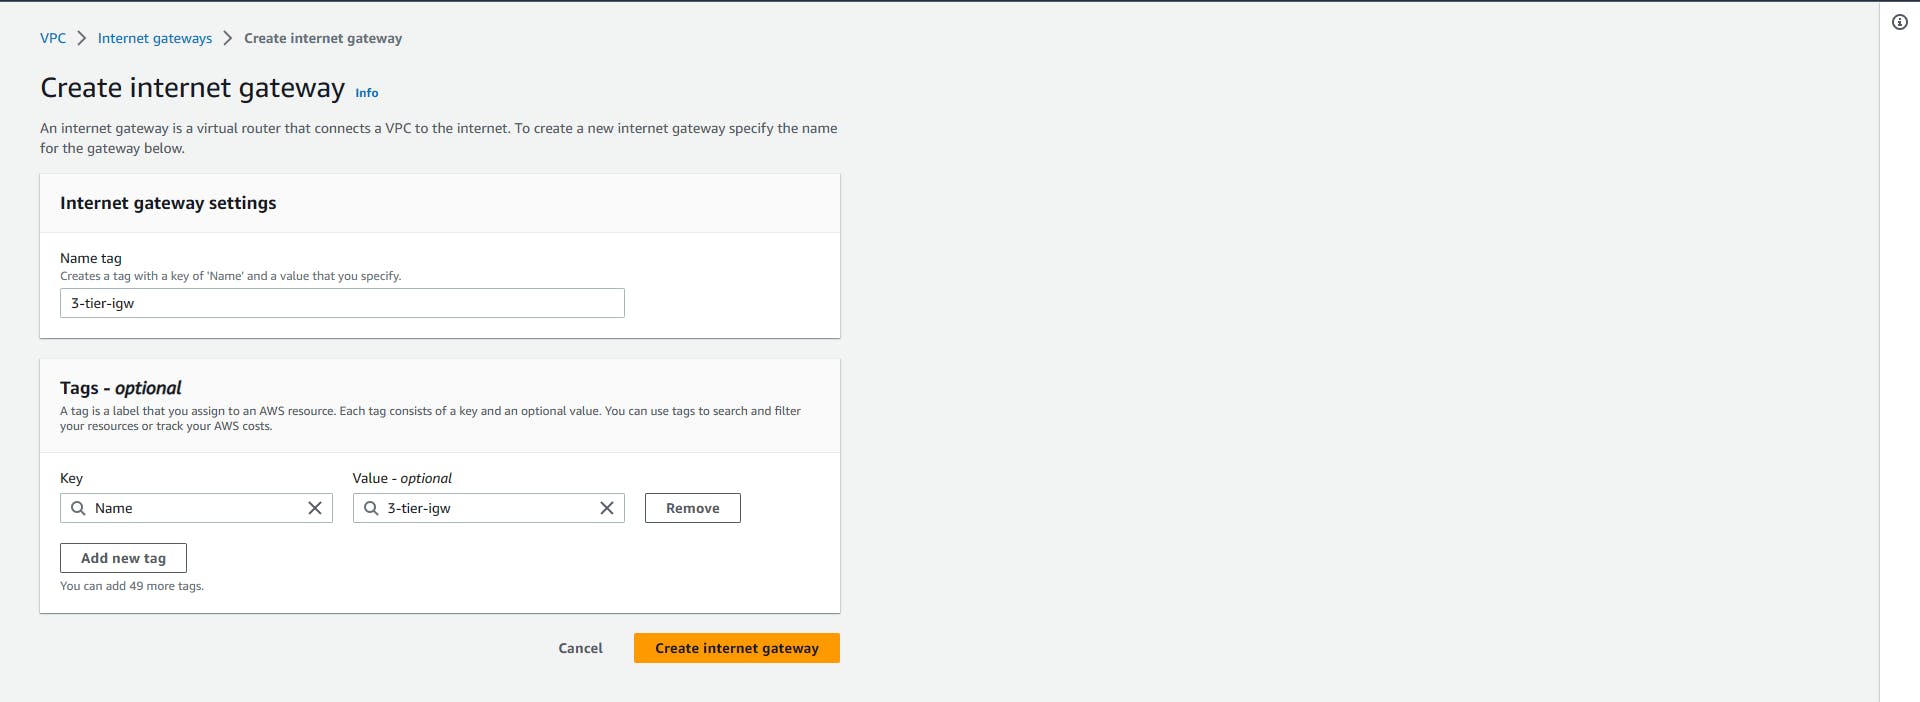
Creating an internet gateway is as easy as just giving it a name. Name the Internet gateway and click create
Internet gateways => Create internet gateway => Input Name => Create
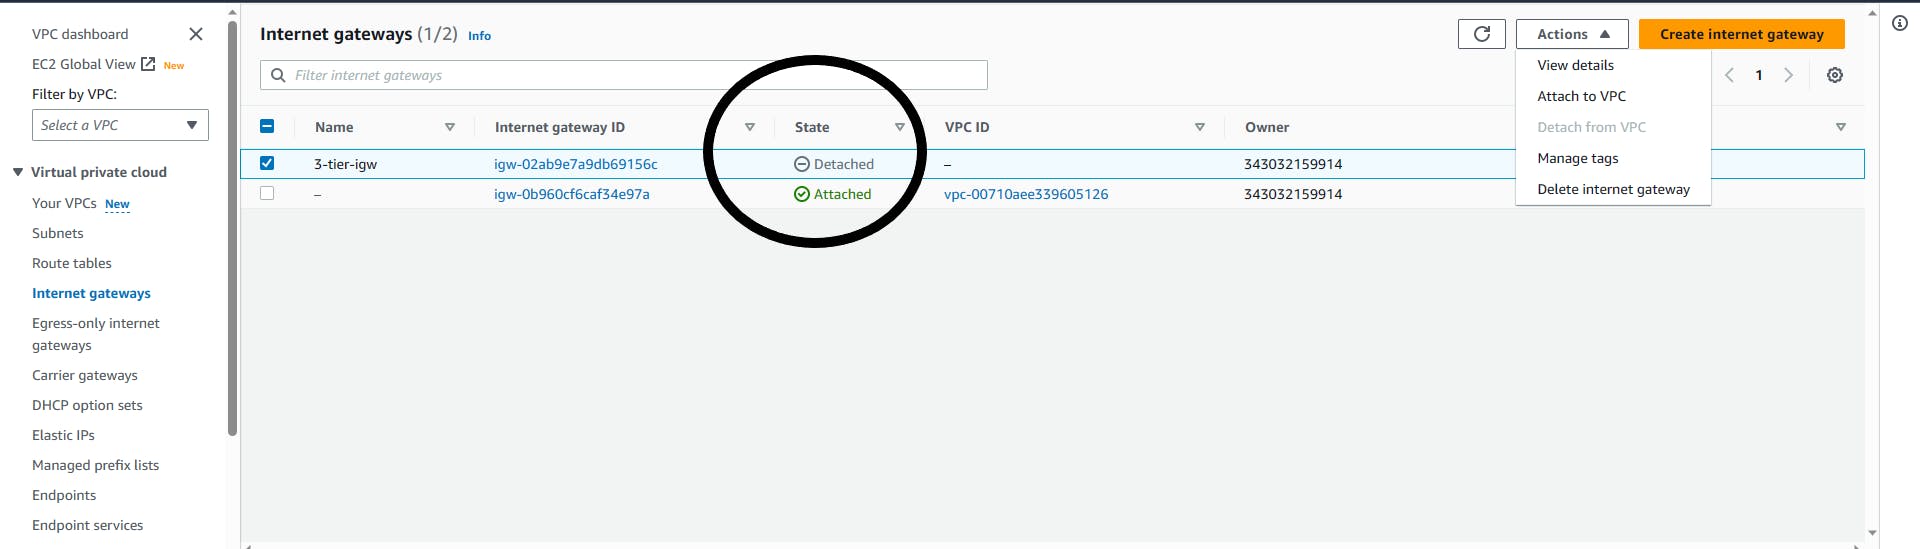
After Creating the Internet gateway, we need to attach it to the VPC we created earlier, as you can see the status is Detached. Select the '3-tier-igw', click 'Action' on the right corner, select 'Attach to VPC'
Internet gateway => Action => Attach to VPC

On this console, select the VPC you created and attach the internet gateway. Now our VPC is attached to the IGW.
Network Address Translation (NAT) Gateway
NAT Gateway is a service that enables outbound and inbound internet connectivity for resources within a private network. It acts as a bridge between the private subnet and the internet by translating private IP addresses to public IP addresses.
Creating the NAT Gateway
Navigate to the Nat gateway console by clicking on Nat gateway at the left corner. Click on Create Nat gateway, name your Nat gateway (mine will be 3-tier-nat), and select the subnet you want it to reside in ( It must be in a public subnet ). I will be using Web-Public-a. Allocate Elastic IP by just clicking on it. Click Create.
Nat gateways => Create Nat gateway => Name Nat => Select public subnet => Allocate EIP => Create

Repeat this same process for Web-public-b. It takes a while to provision, so let's move on to the next.
Route Table
A Route table (RT) is a networking component used to control traffic flow within a Virtual Private Cloud (VPC) and to external networks. It contains rules (routes) that determine how traffic is directed between subnets and to the internet or other networks.
Creating the Route table
We will be creating two route tables, one for Public subnets and one for Private subnets.
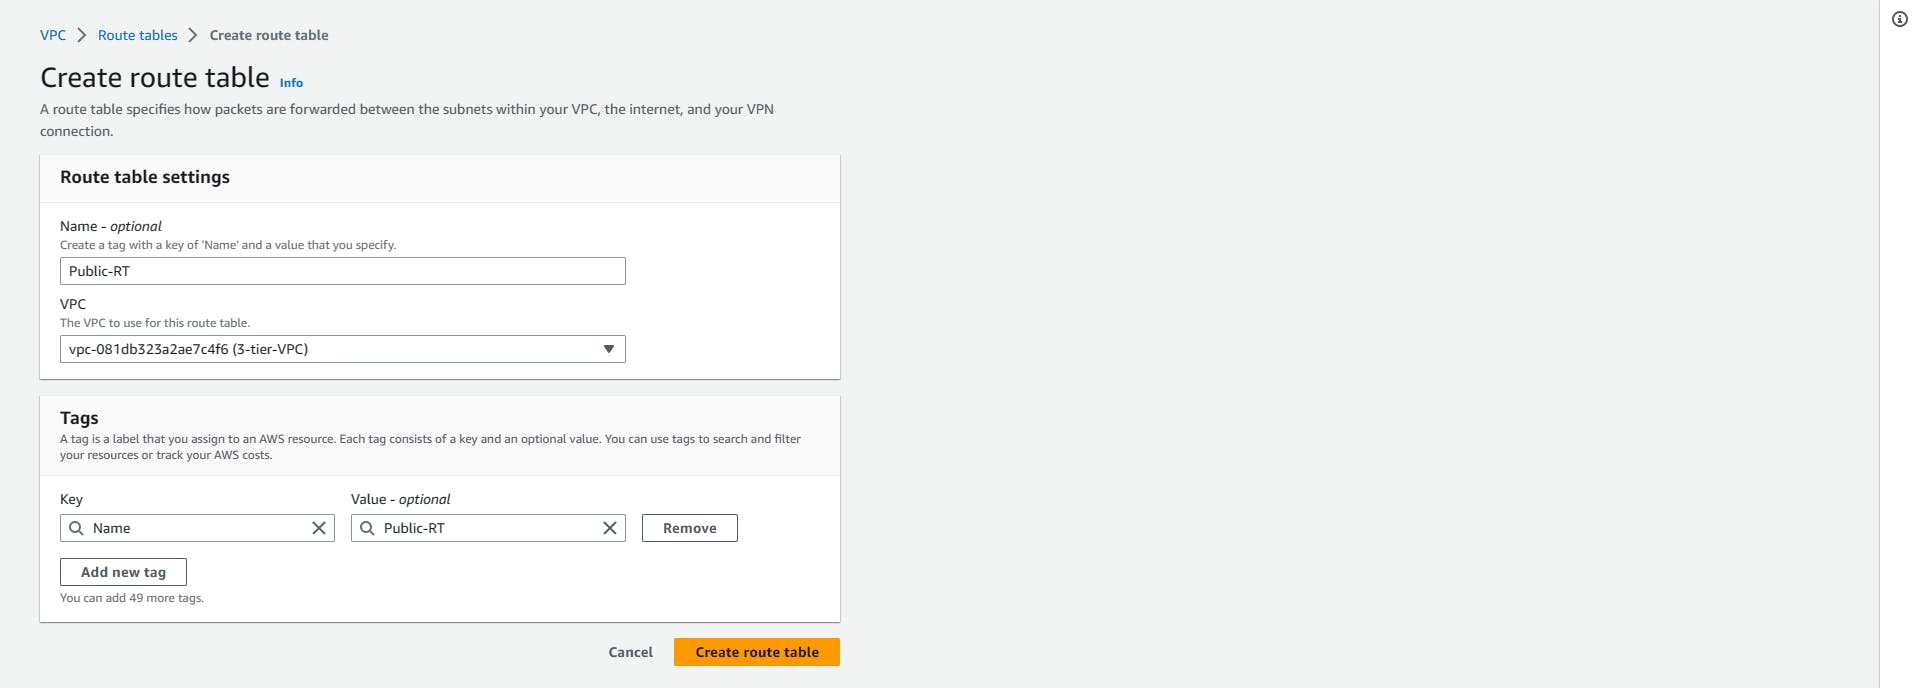
Navigate to the route table console, click Create route table, name your route table (mine will be Public-RT ), select your VPC from the drop-down, and click create
Route tables => Create route table => Name => Select your VPC => Create
Repeat the same process for the Private-RT, don't forget to select your VPC

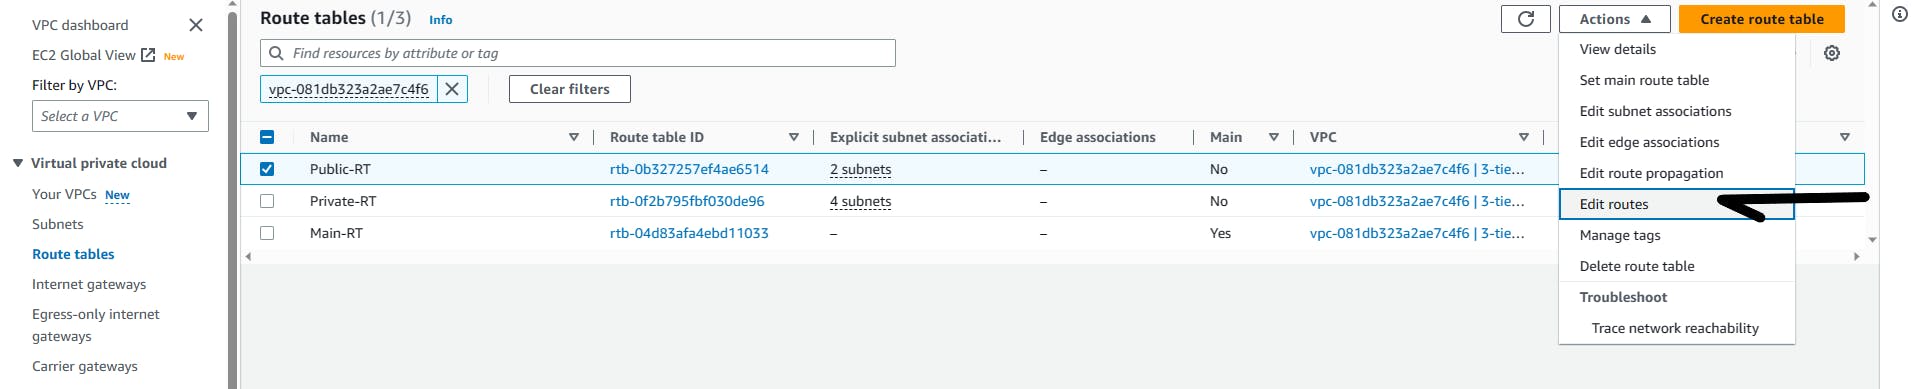
You should have something like this. The last RT was created for you by AWS (they create lots of things) when your VPC was created. It's the main route table, I will advise you to rename it with Main-RT to avoid confusion

Time to associate your subnet to the route table.
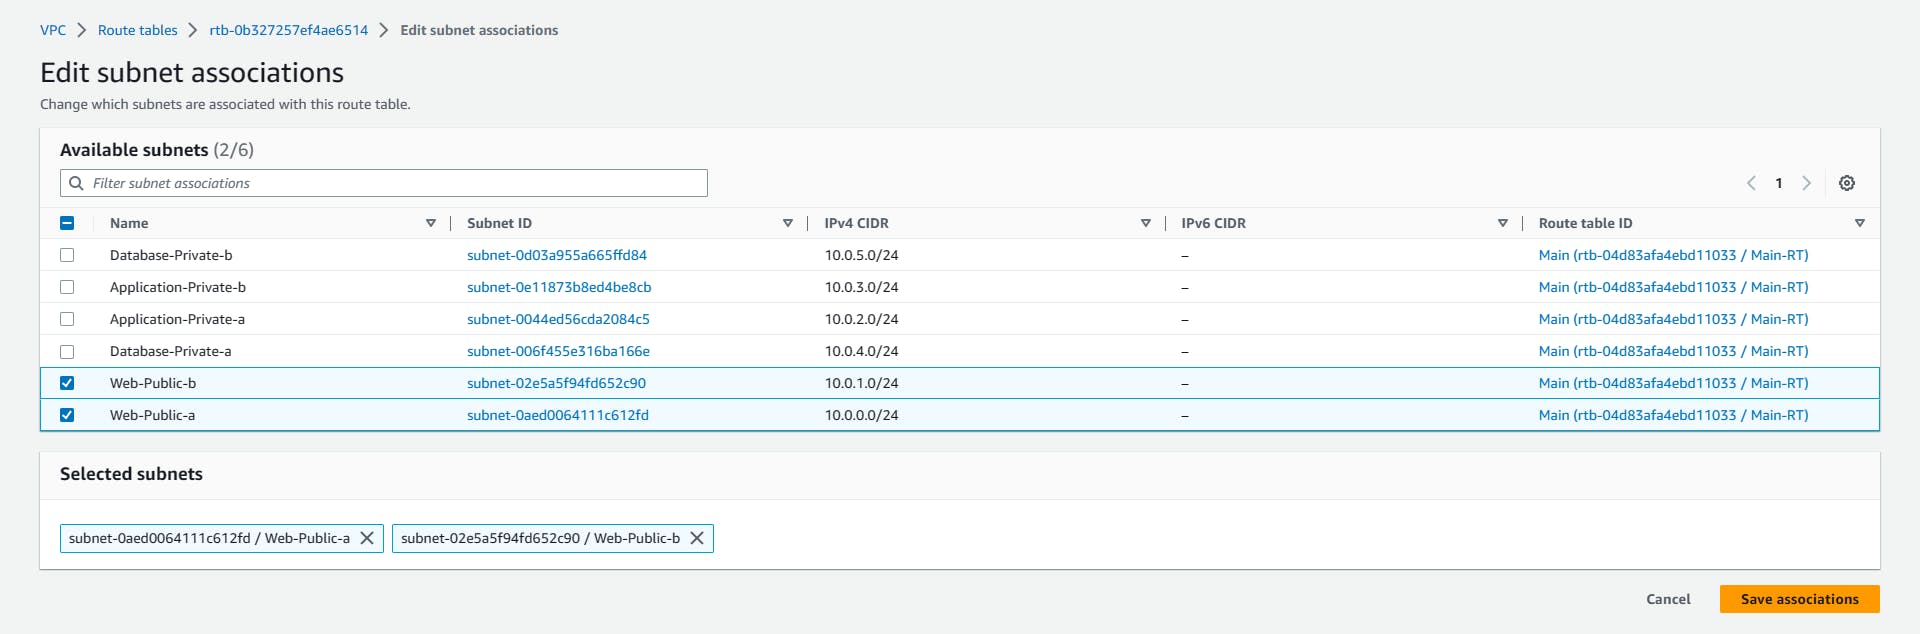
Public-RT => Actions => Edit subnet associations => Public Subnets => Save

For the Pubic-RT select the Public subnets (Web-Public-a and Web-Public-b) and save associations
Repeat the same process for Private-RT, but this time select the four Private subnets and Save.

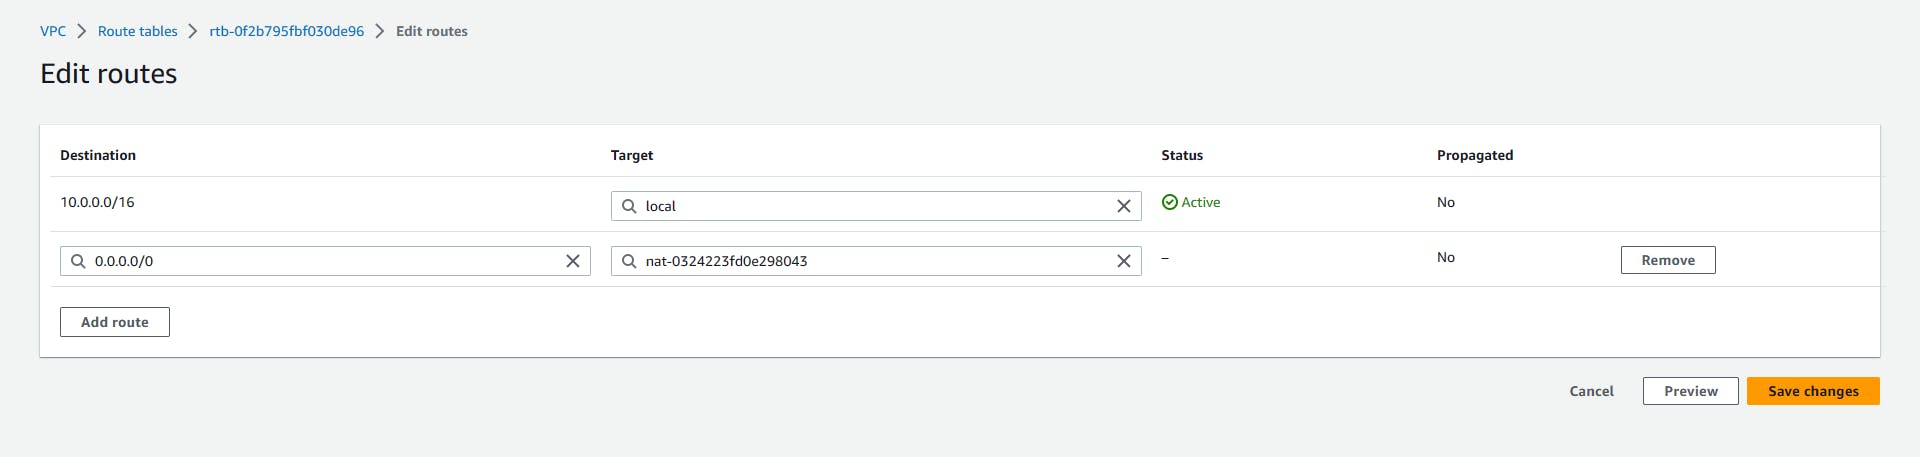
Attaching IGW and NAT to the Route Table
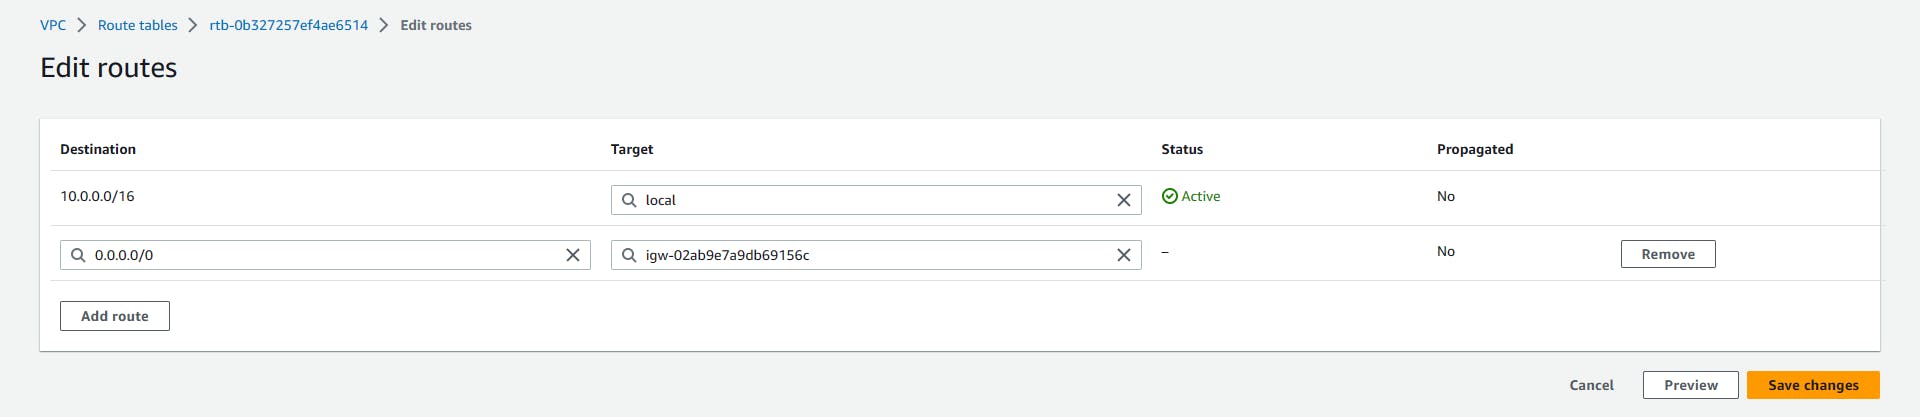
Select the Public-RT => Actions => Edit routes => Add route =>
Destination: 0.0.0.0/0 => Target: Internet gateway (this will automatically display the igw you created earlier) => Save changes.
What this does is, any traffic that's not within our local network will be routed through the internet gateway.
Repeat the same process for Private-RT
Select Private-RT => Actions => Edit Route => Add route =>
Destination: 0.0.0.0/0 => Target: Nat Gateway (the two nat gateway will be displayed, I will be selecting the 3-tier-nat-a) => Save changes
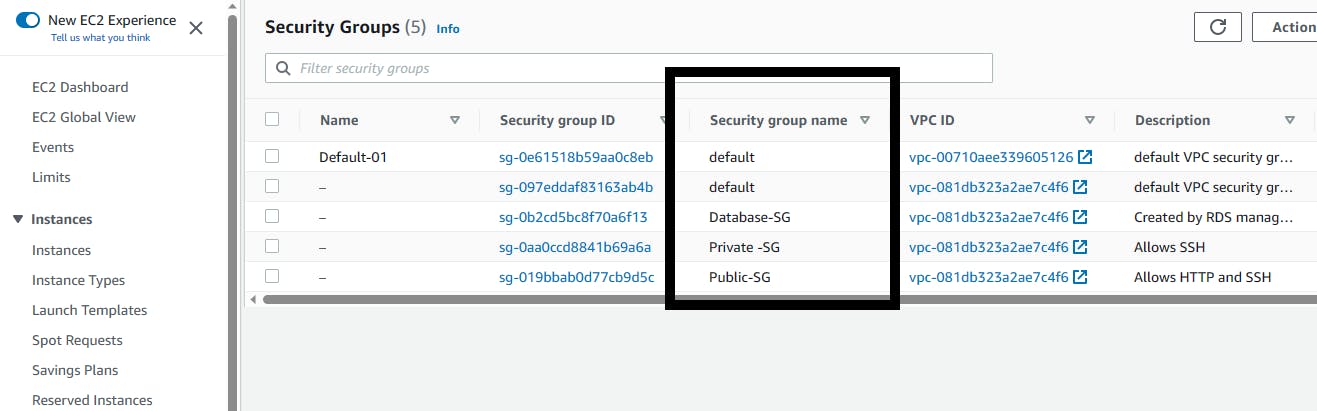
Security Group
Security Groups acts as a virtual firewall that controls inbound and outbound traffic for resources such as virtual machines, or database instances
You will be creating two security groups, one that allows HTTP and SSH, and another that allows just SSH.
Security Groups => Create security group => Name => Select your VPC
Navigate to the security group on the VPC Console, and click on Create. Give the Security Group a name (naming mine Public-SG) and description (Allow HTTP and SSH), and make sure to select your VPC from the drop-down, then create.
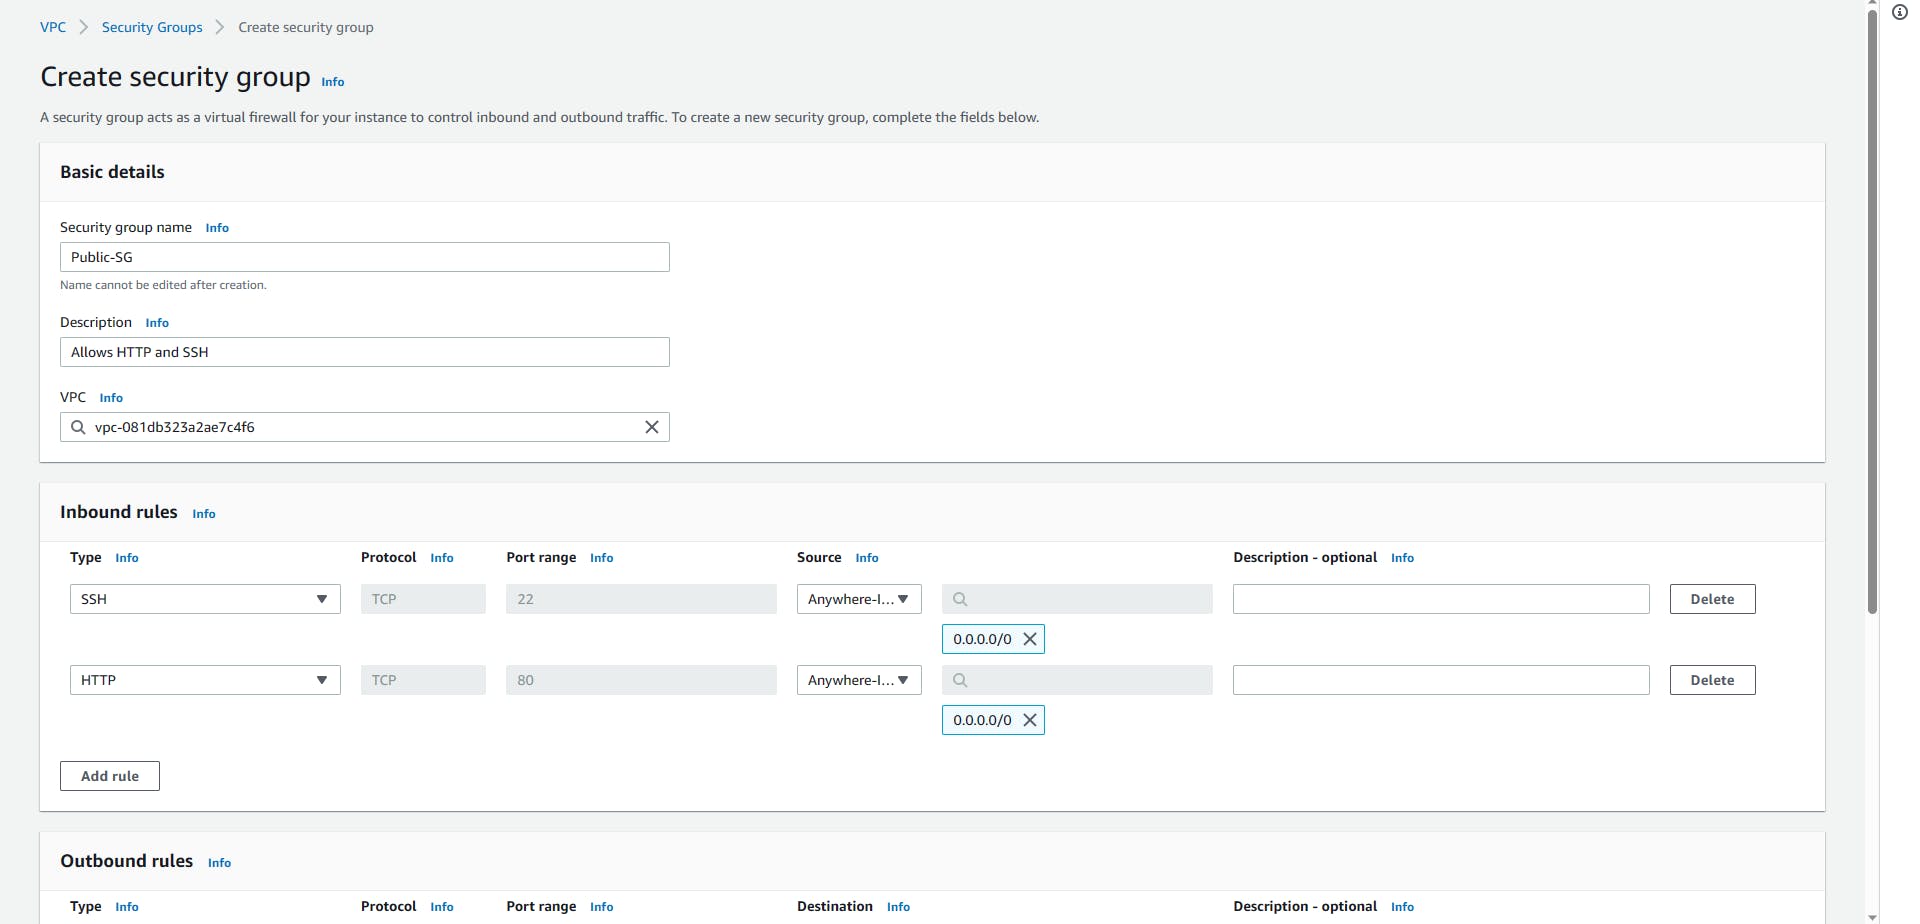
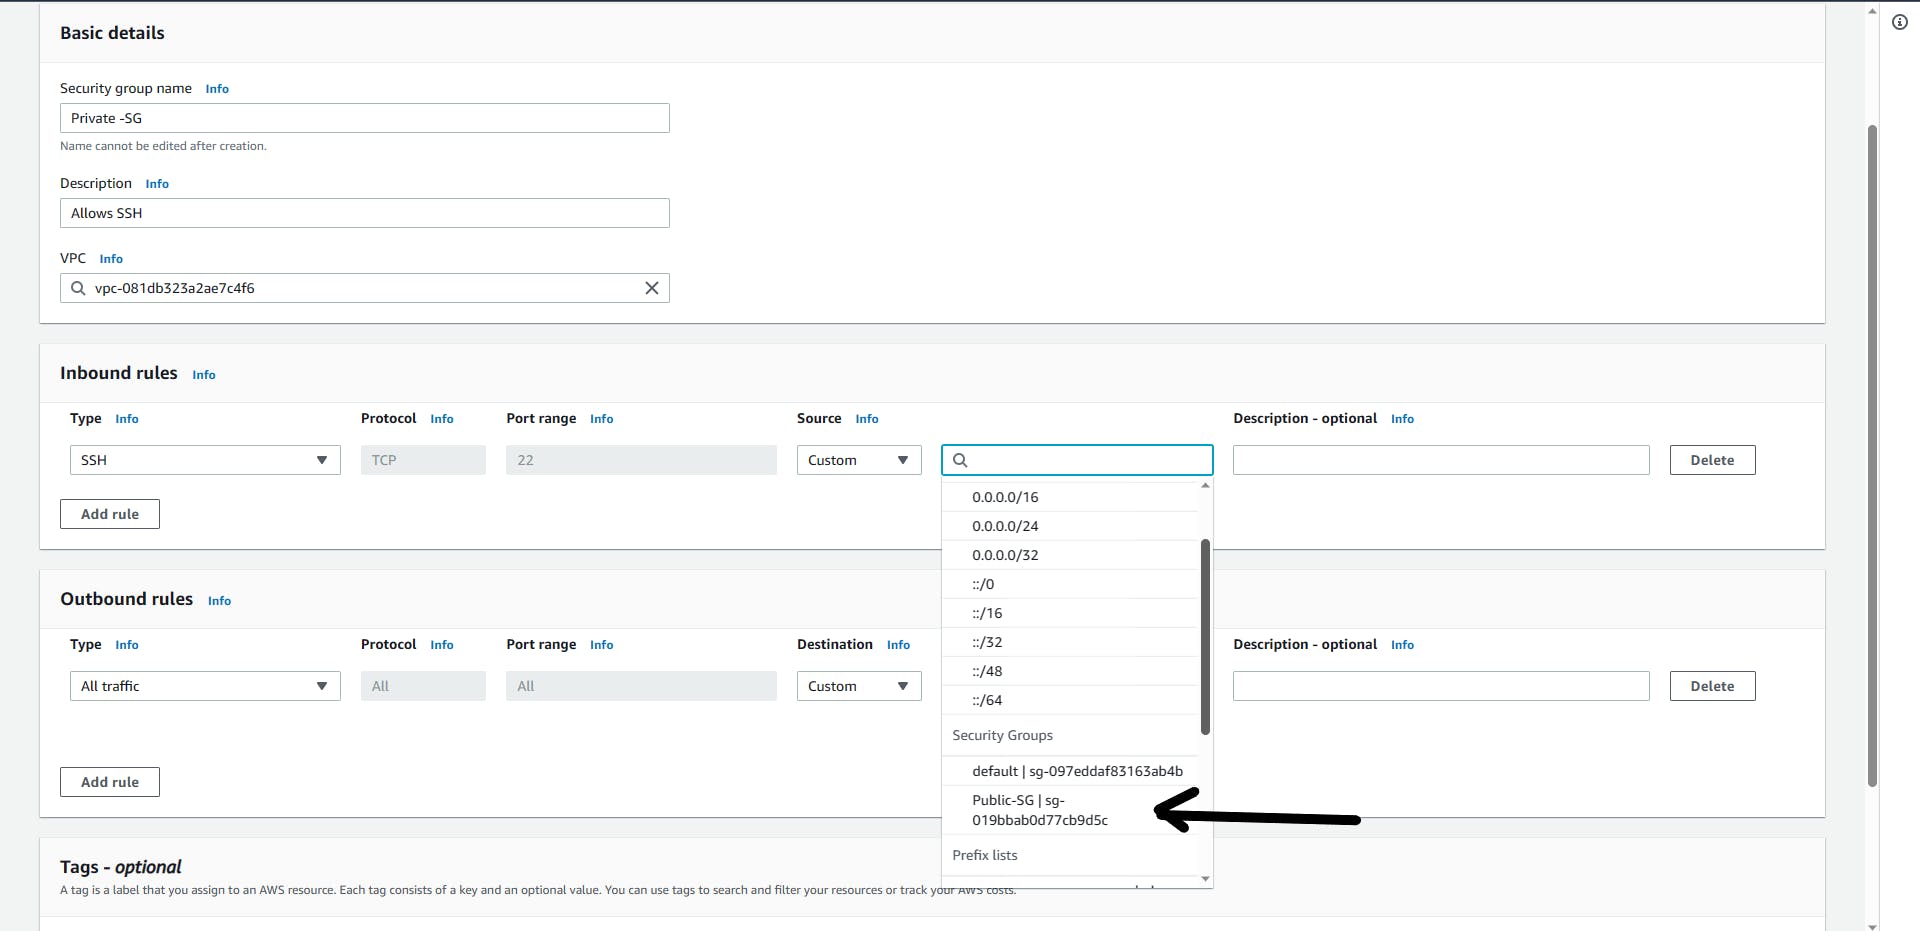
Repeat the same steps and create the second SG, with the name (Private-SG), and Description (Allow SSH), but this time just SSH from the Public-SG we created earlier and click Create.

Network Access Control Lists
Network Access Control Lists (NACL) is a security layer for the VPC that controls the traffic in and out of one or more subnets. It is an optional layer for your VPC. It is a firewall similar to the security groups but it is applied at the subnet level.
Creating NACL
Navigate to the Network ACLs on the VPC console. There are some default NACLs already created by AWS per VPC, default NACL allows all inbound and outbound rules. You need to create your to have more control over the subnet
Create network ACL
Name: 3-tier-NACL
VPC: Select your VPC from the drop-down
Click: Create

You need to edit the subnet associations.
Actions => Edit subnet associations
Add the two Web-tiers

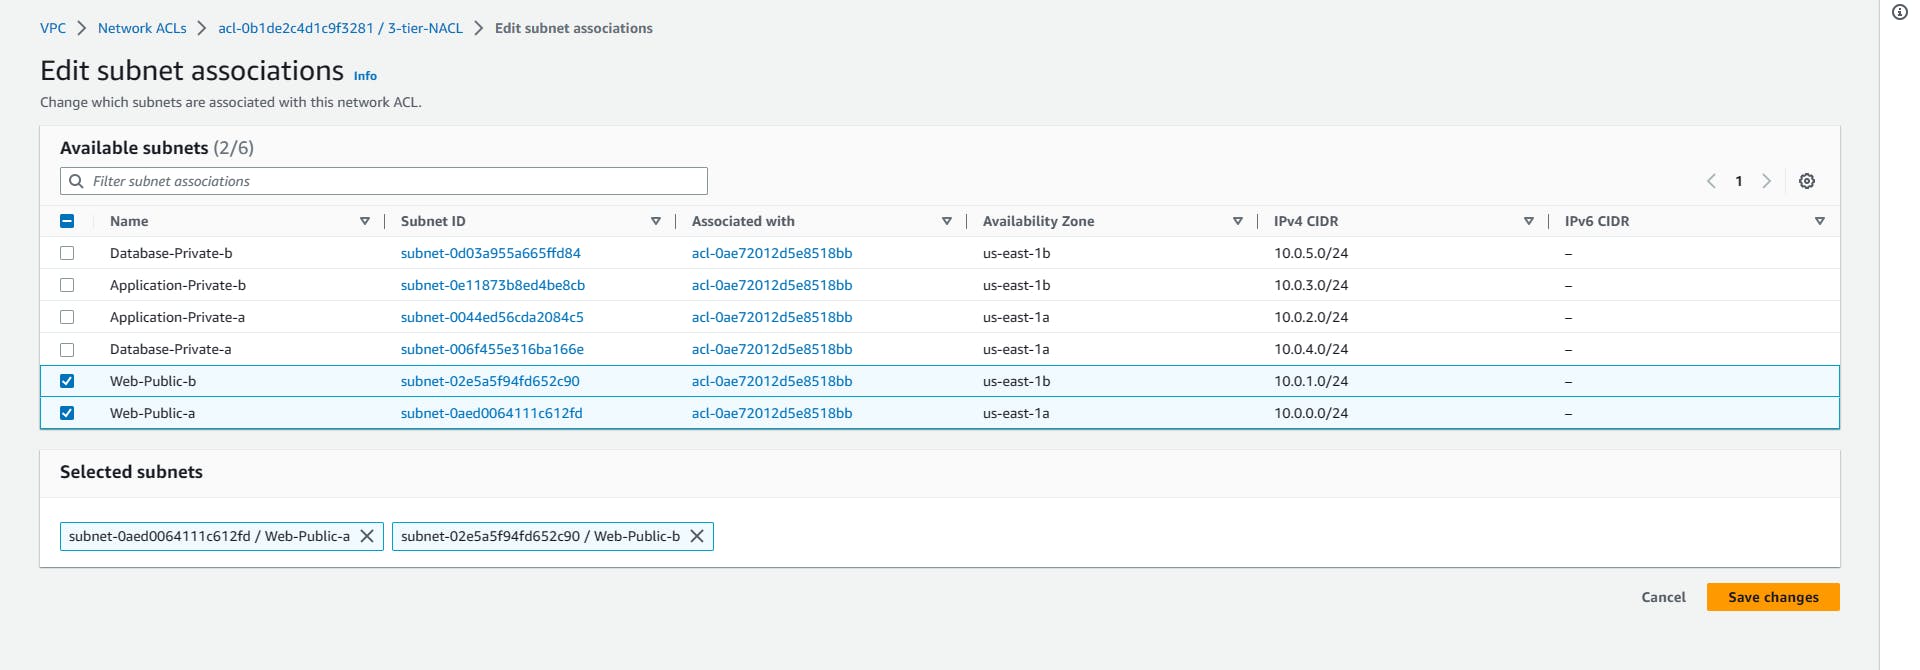
The Web tier is the most vulnerable, so it needs to be protected. You can repeat the same step for the Application tier.
STAGE 2
Let's move to the EC2 Console to continue the rest. => Search EC2 on the search bar
Launch Template
A Launch Template is a configuration blueprint for launching instances. It captures instance settings for consistent and automated deployments.
creating the launch template
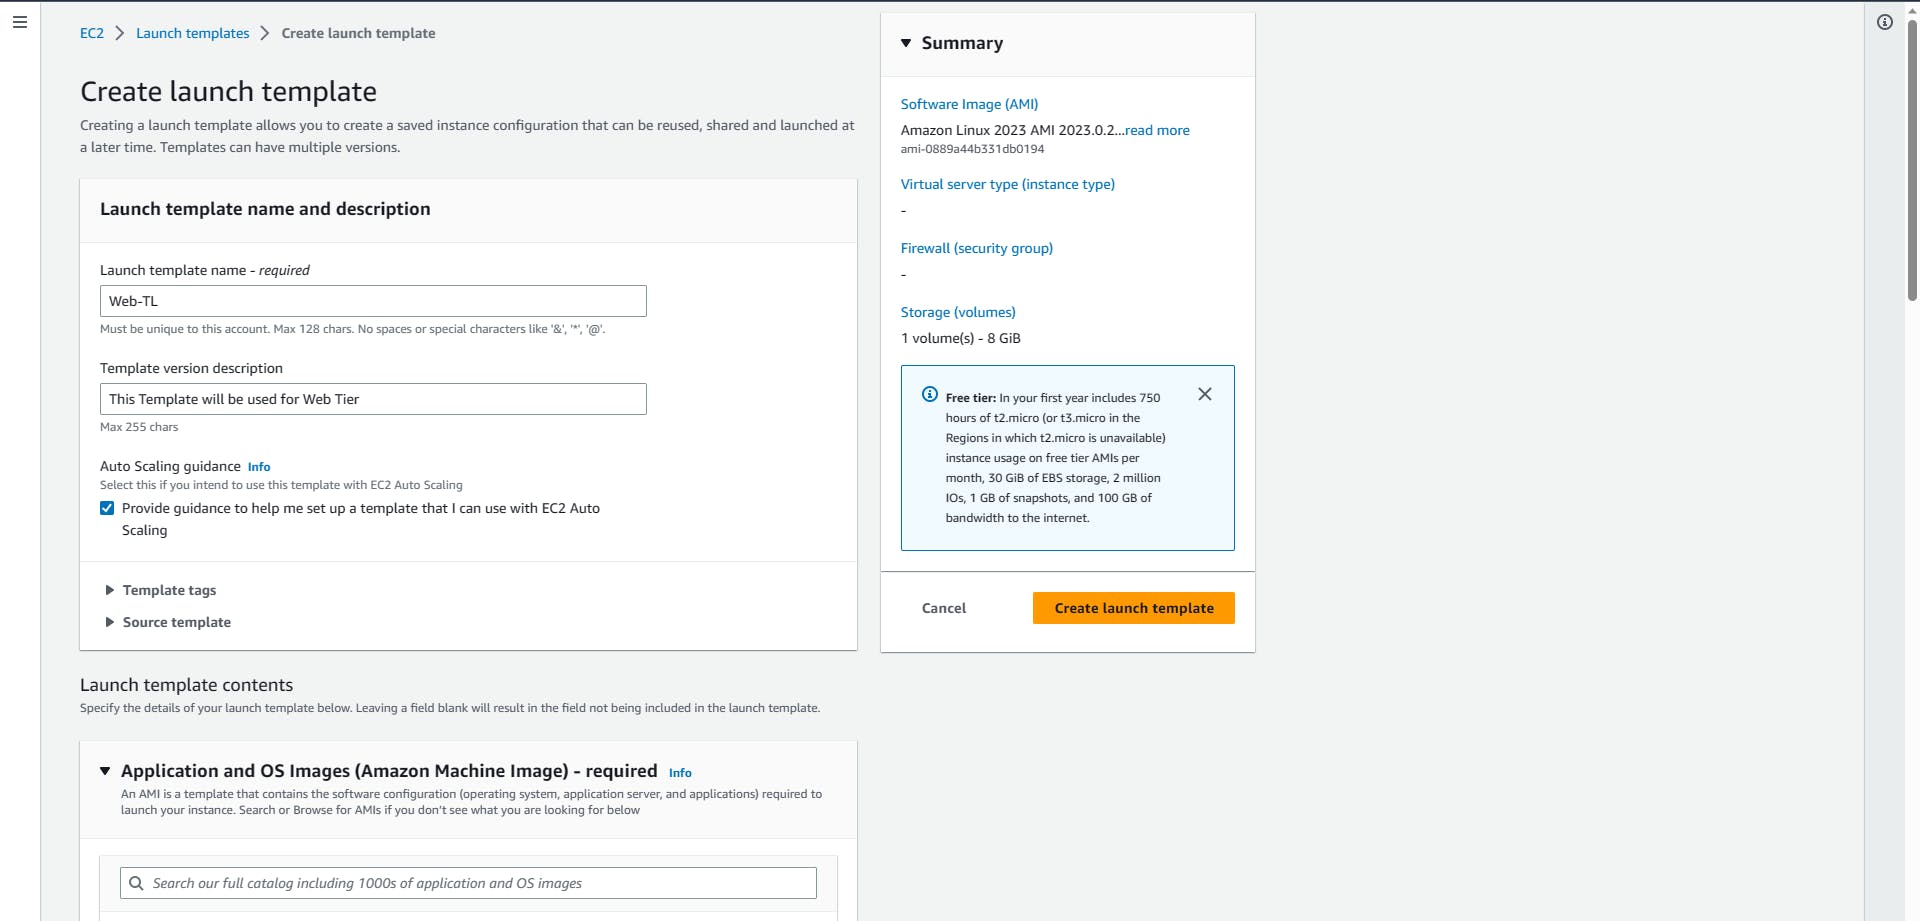
Web Tier Launch Template
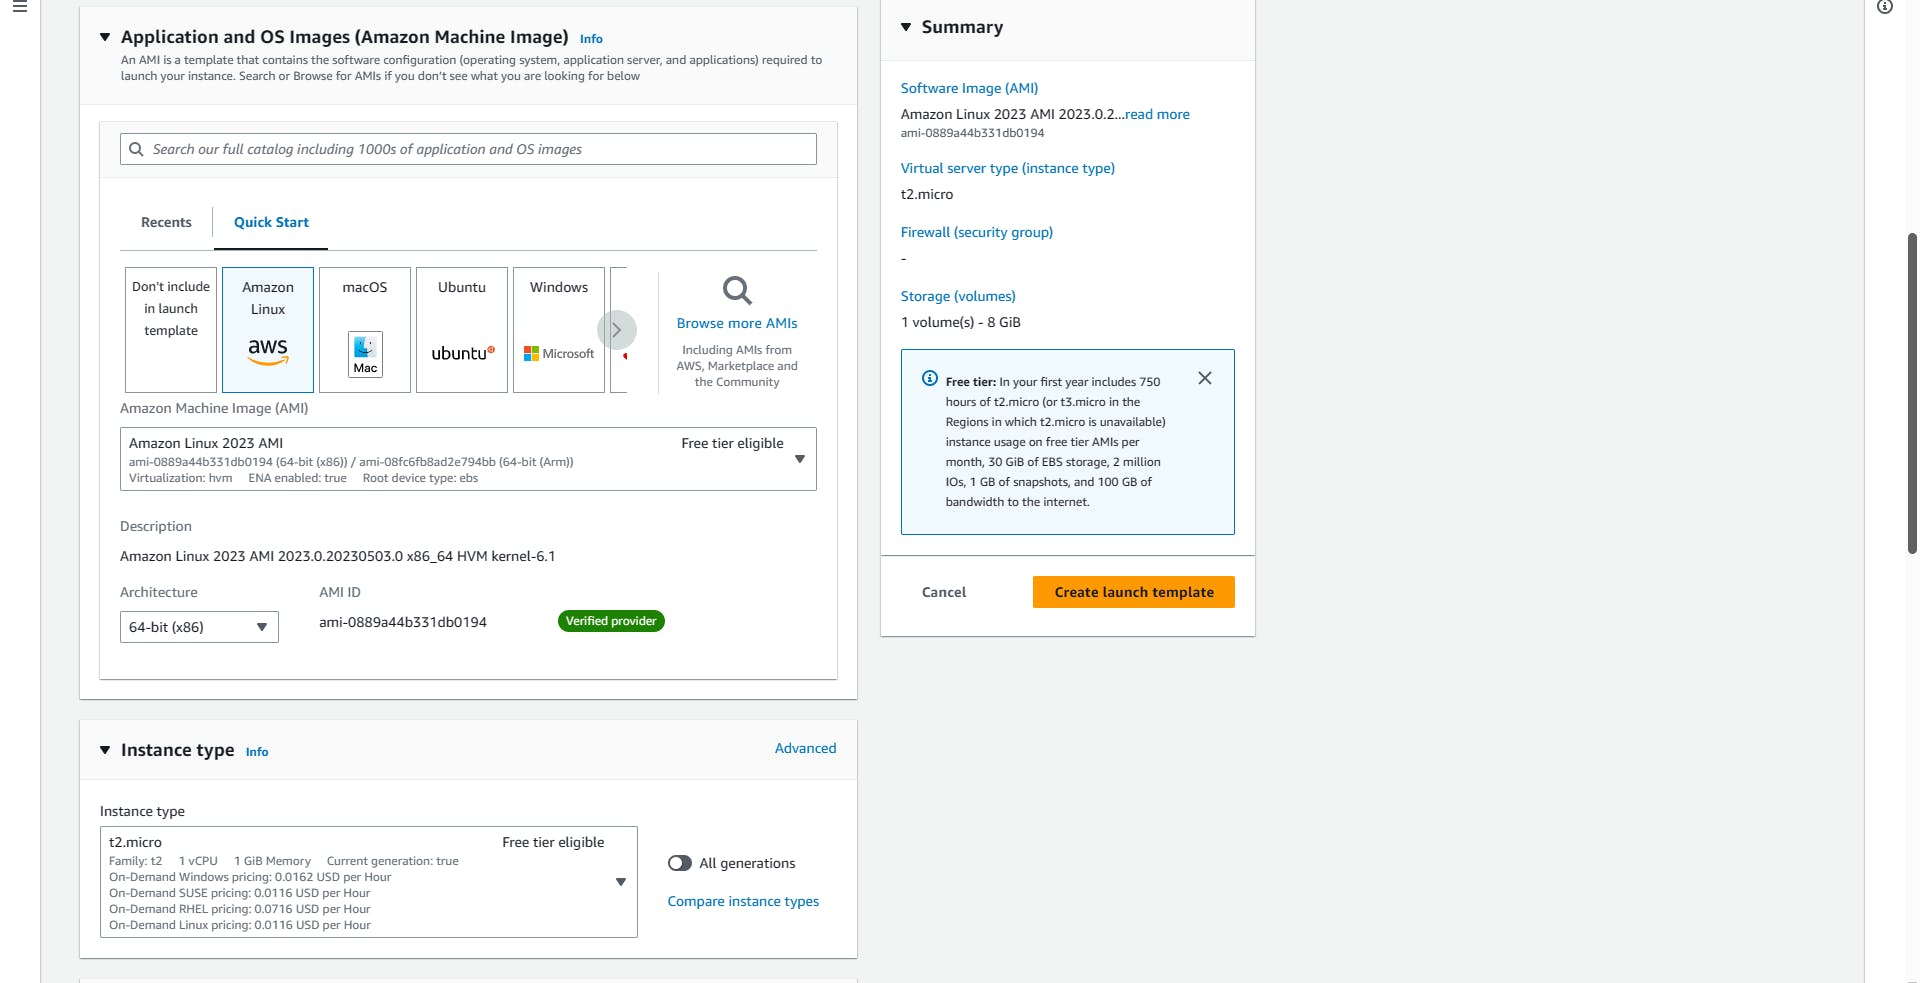
On the EC2 Console, stroll to locate the Launch Templates and Create launch template.
Give it a name (mine will be Web-TL), Note: this template will be used for deploying EC2 on the web-tier.
Description: This Template will be used for Web Tier
Select the OS of your choice (I will be using Amazon Linux).
Select the instance type (I will be using t2.micro).
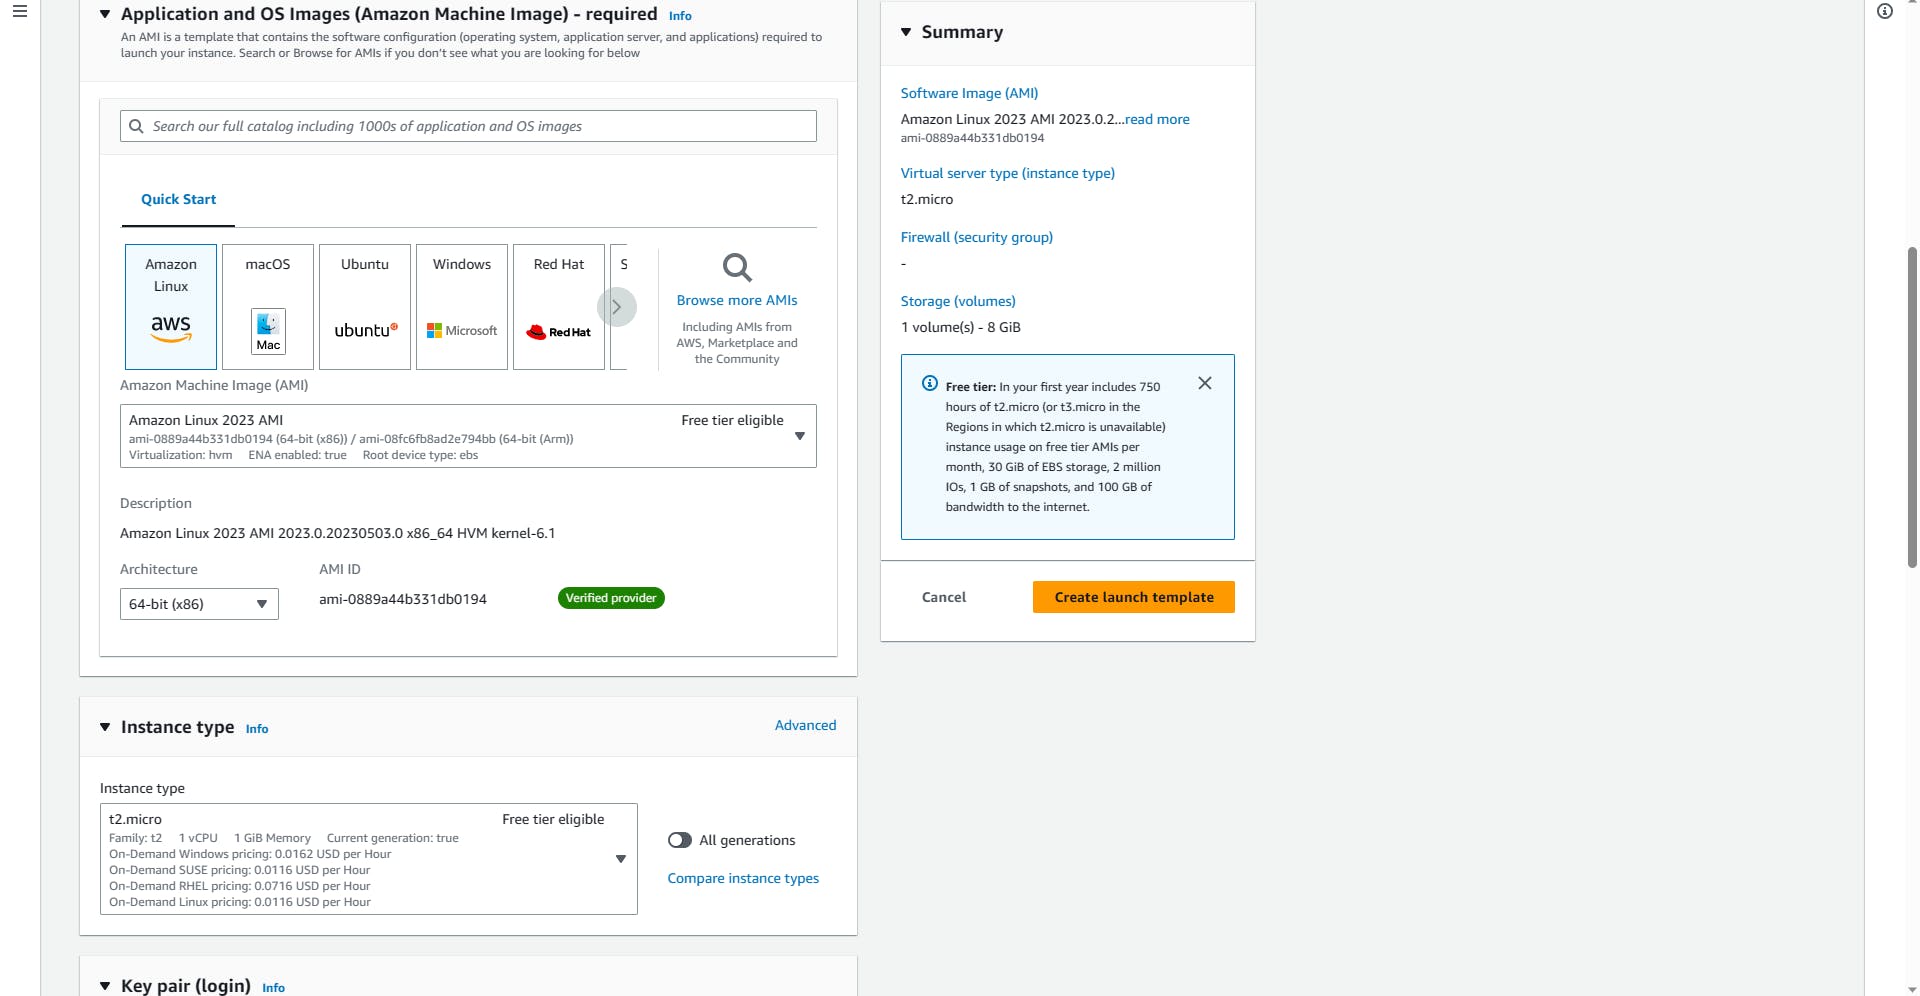
Create new key pair (Web-LT-KeyPair), it will be downloaded automatically.
In the Network settings
Select existing security group
- Select the Public-SG from the drop-down

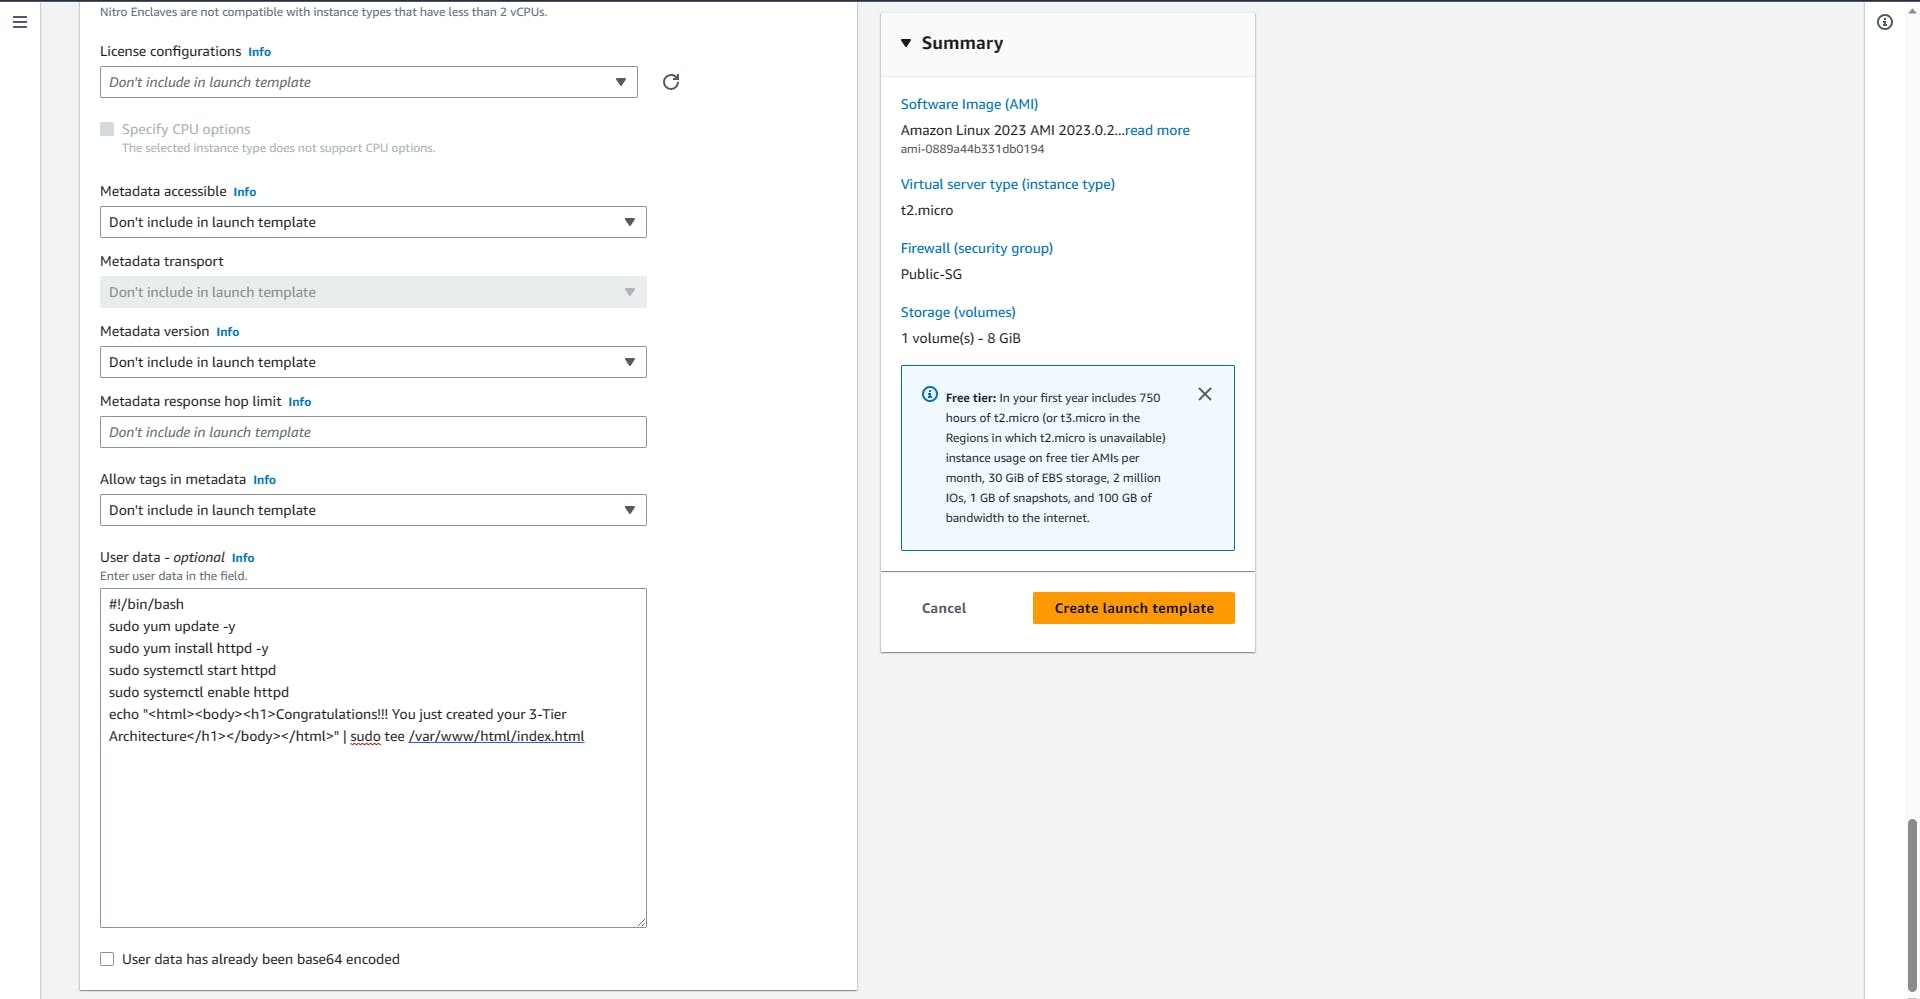
Stroll to the Advanced details
User data: Paste the provided Bash Script into the space
  #!/bin/bash
  sudo yum update -y
  sudo yum install httpd -y
  sudo systemctl start httpd
  sudo systemctl enable httpd
  echo "<html><body><h1>Congratulations!!! You just created your 3-Tier Architecture</h1></body></html>" | sudo tee /var/www/html/index.html
Go through it once again to be sure everything is correct, leave the rest as default and create.
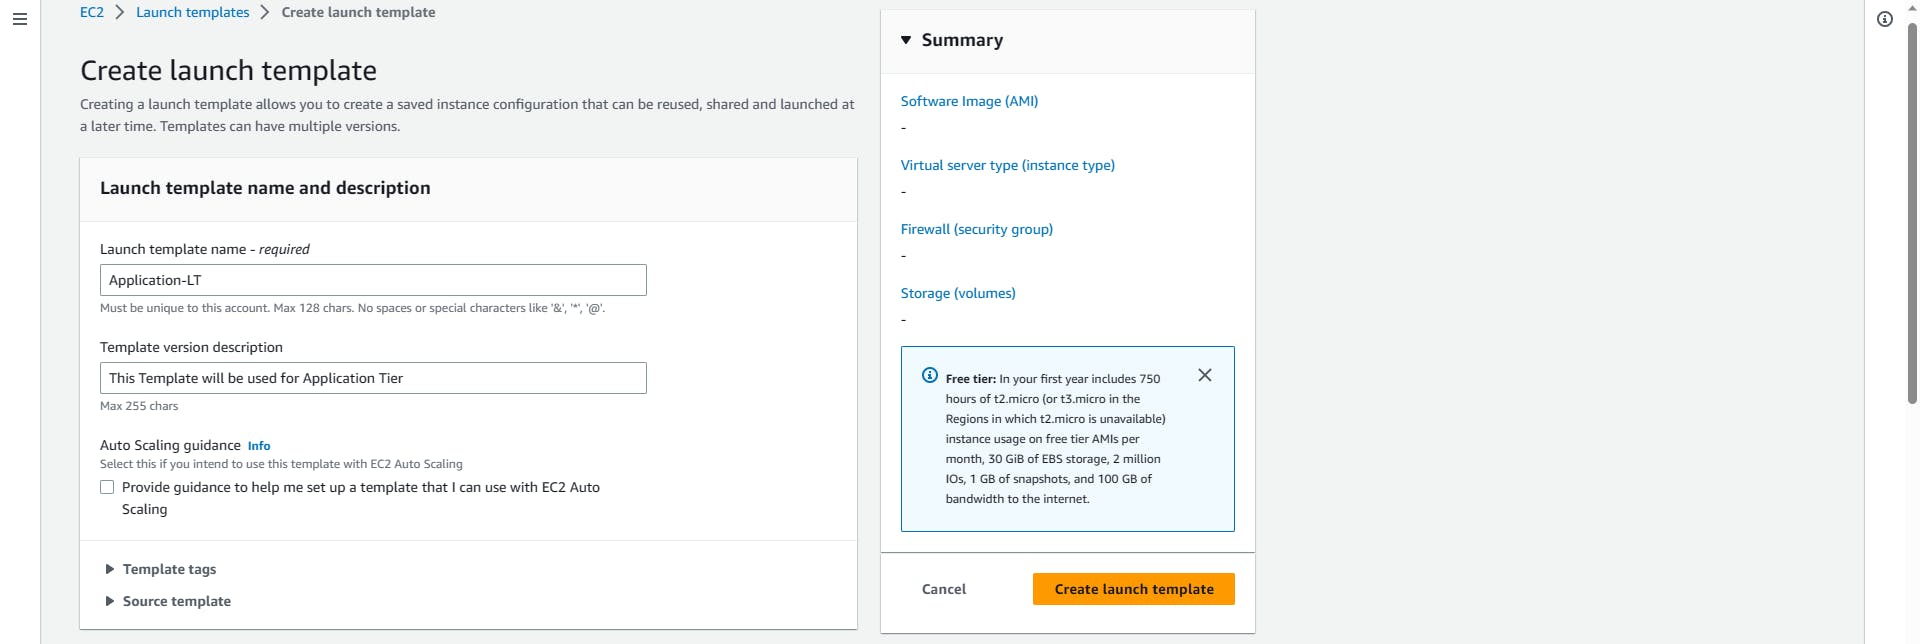
Application Tier Launch Template
You will be repeating the same steps but with little adjustment
Name: Application-LT
Description: This Template will be used for Application Tier
Select the OS of your choice (I will be using Amazon Linux).
Select the instance type (I will be using t2.micro).
Create new key pair (Application -LT-KeyPair). It is best to create different keypairs per tier for increased security.
In the Network settings
Select existing security group
- Select the Private-SG from the drop-down
No need to add the user data.
Stroll down and create.

- Next
NOTE: You are yet to create any EC2, so none will show here, but it will be automatically propagated when you attach it to the Auto Scaling group.
Auto Scaling group
The Auto Scaling group automatically adjusts the number of instances in an environment based on predefined conditions, ensuring optimal performance and resource utilization.
Creating autoscaling group
Web Tier Auto Scaling group
On the EC2 console, navigate to Auto Scaling Groups, Create Auto Scaling group
Name: Web-ASG
Launch template: Select the Web-TL from the drop-down
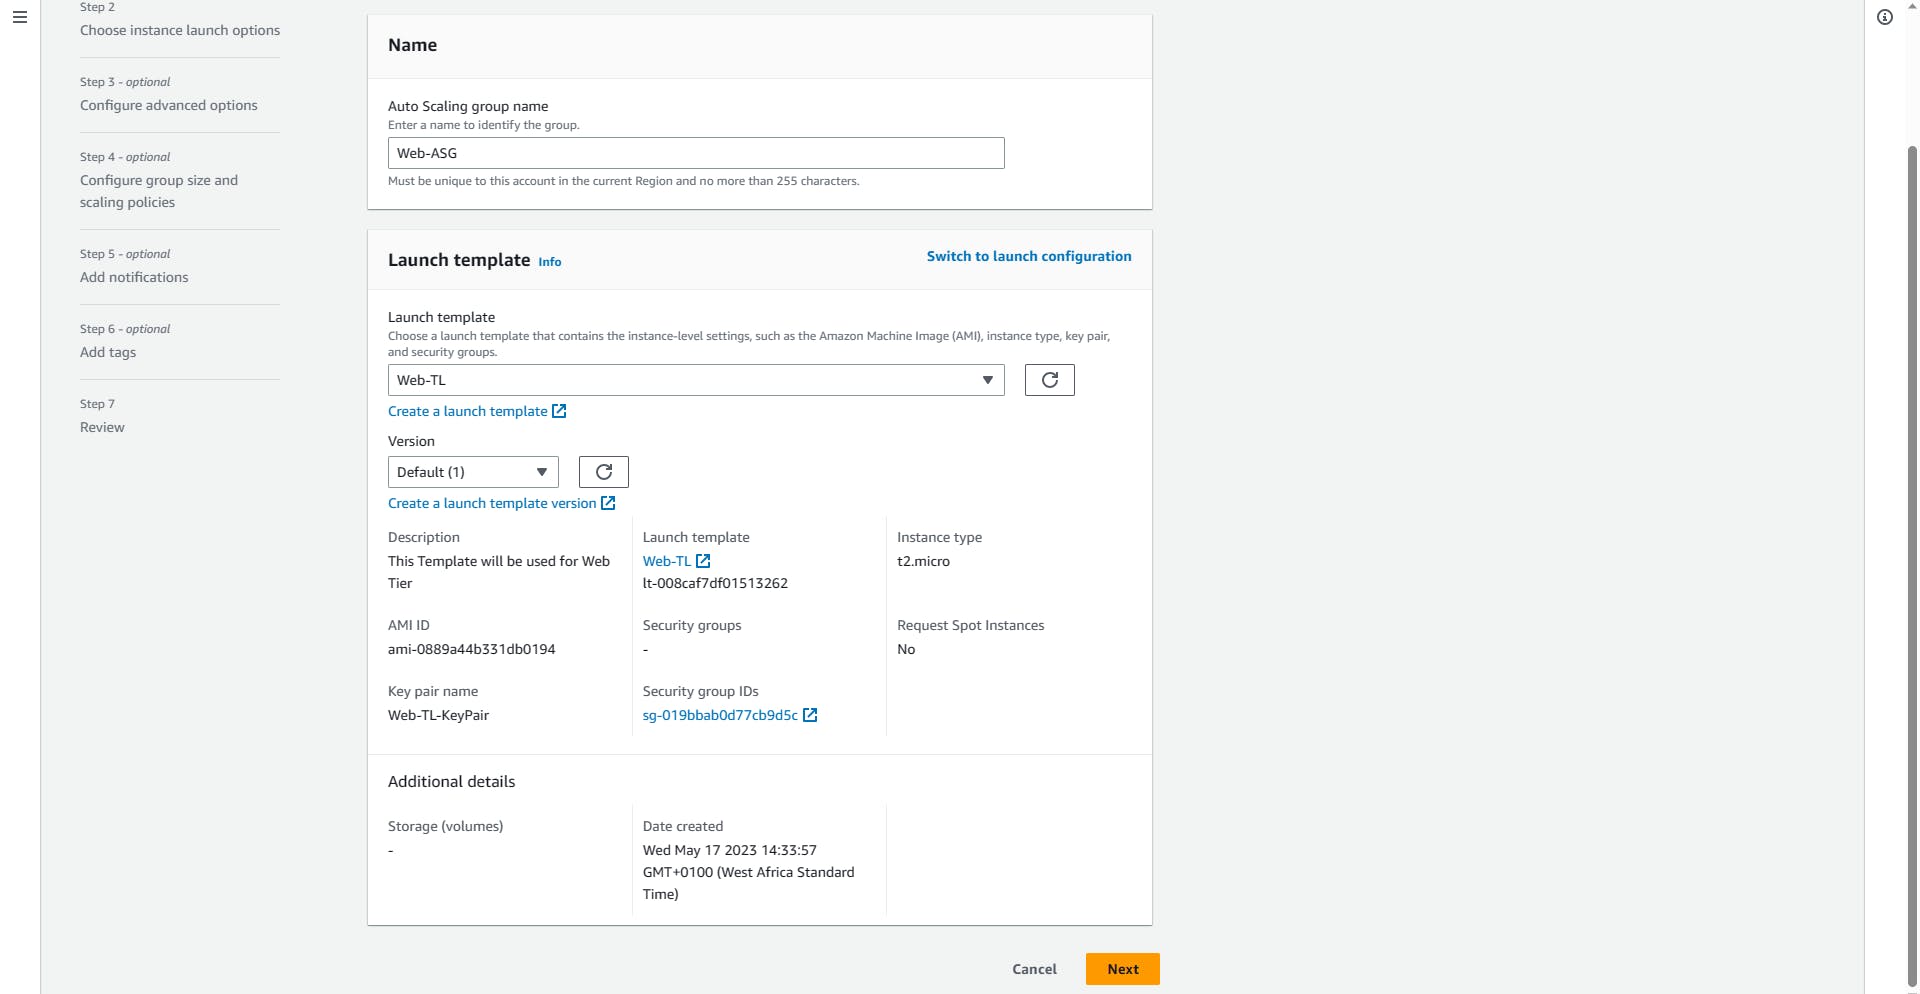
Next
Network
VPC: Select your VPC from the drop-down (3-tier-VPC)
Availability Zones and Subnets: Select your two Web-Tiers
Web-Public-a and Web-Public -b

Load balancing; Attach to a new load balancer
Load balancer type: Application Load Balancer
Load balancer name: Web-LB
Load balancer scheme: Select=> Internet-facing
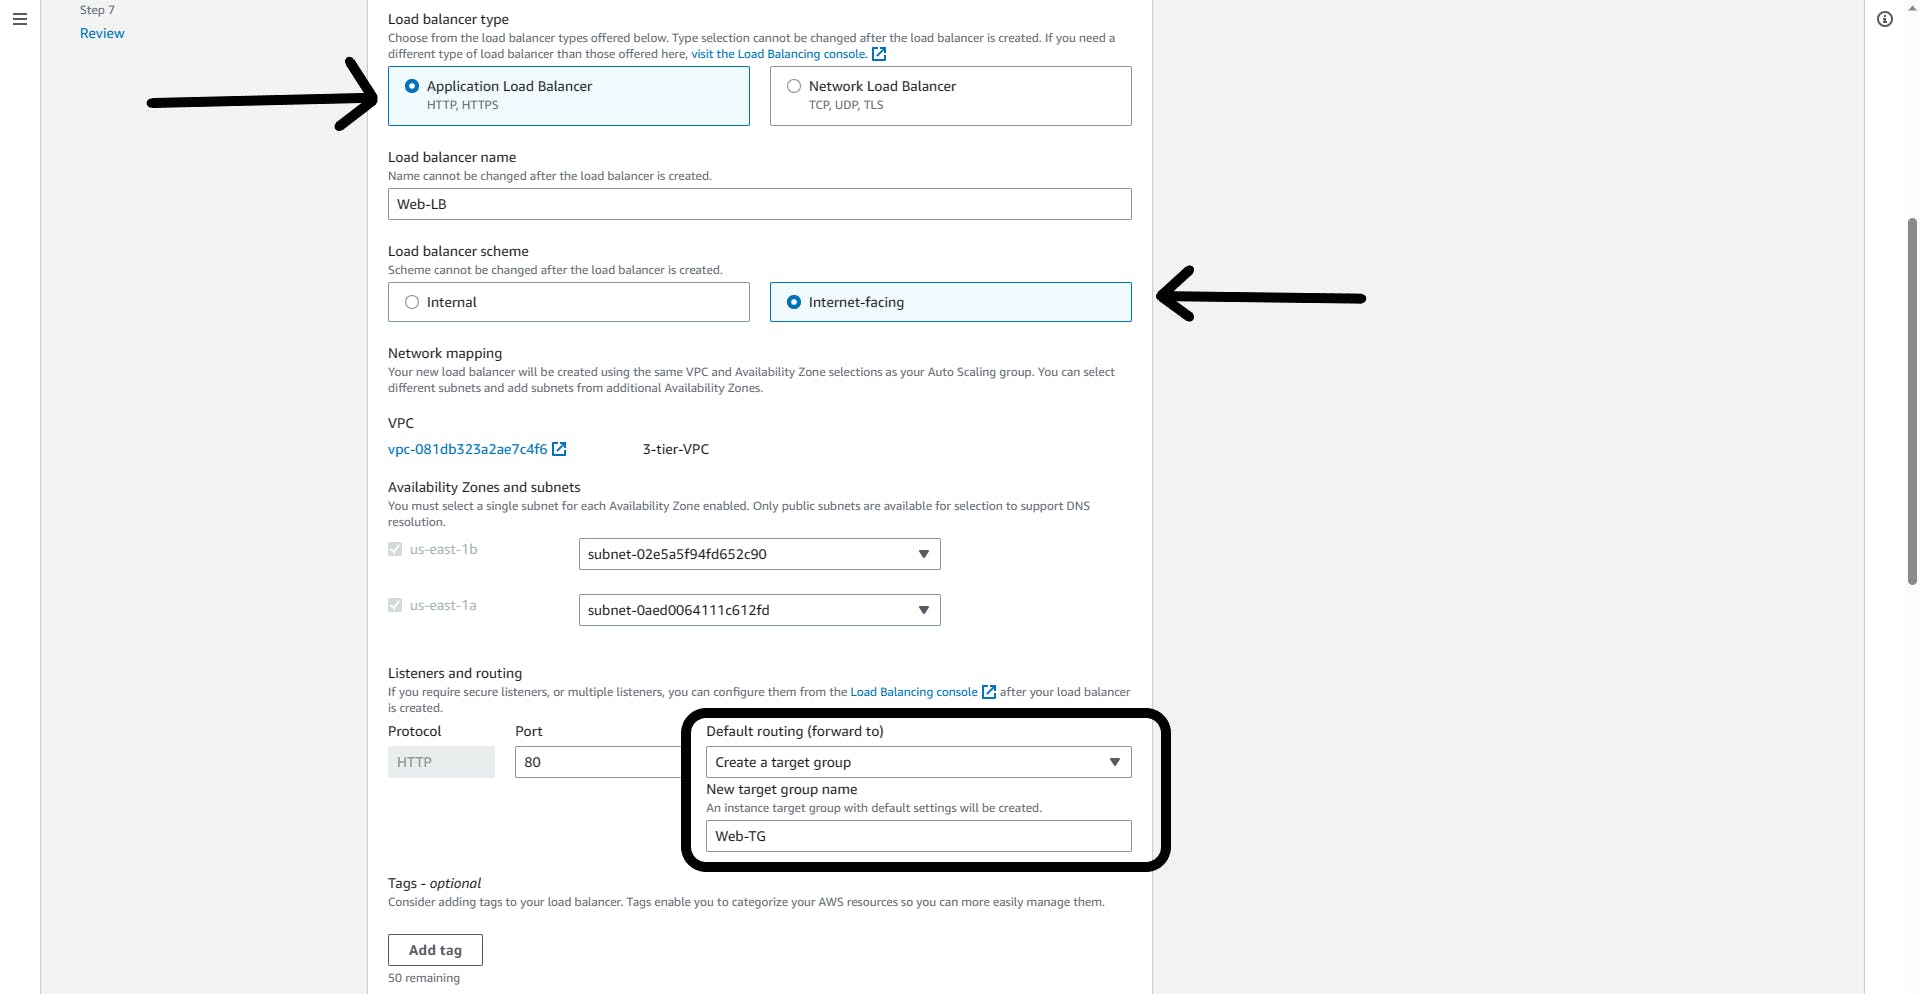
Listeners and routing:
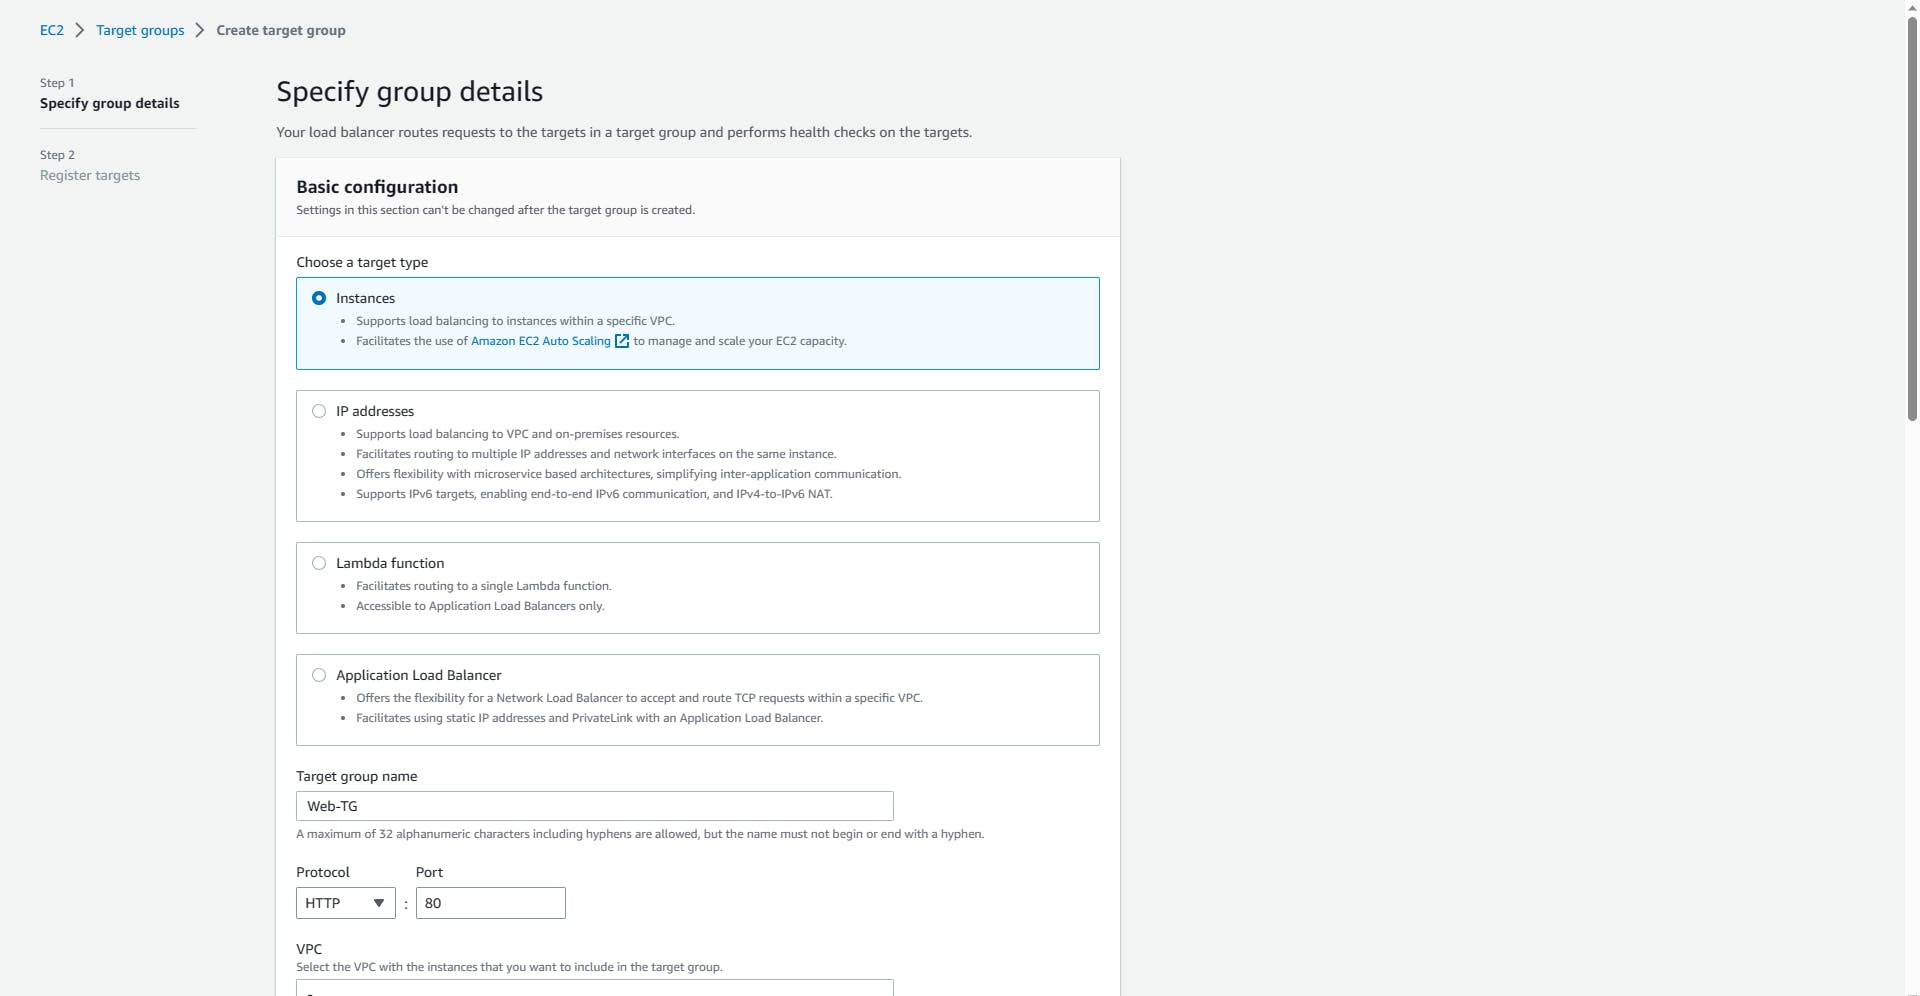
- Create a target group; Give it a name (Web-TG)
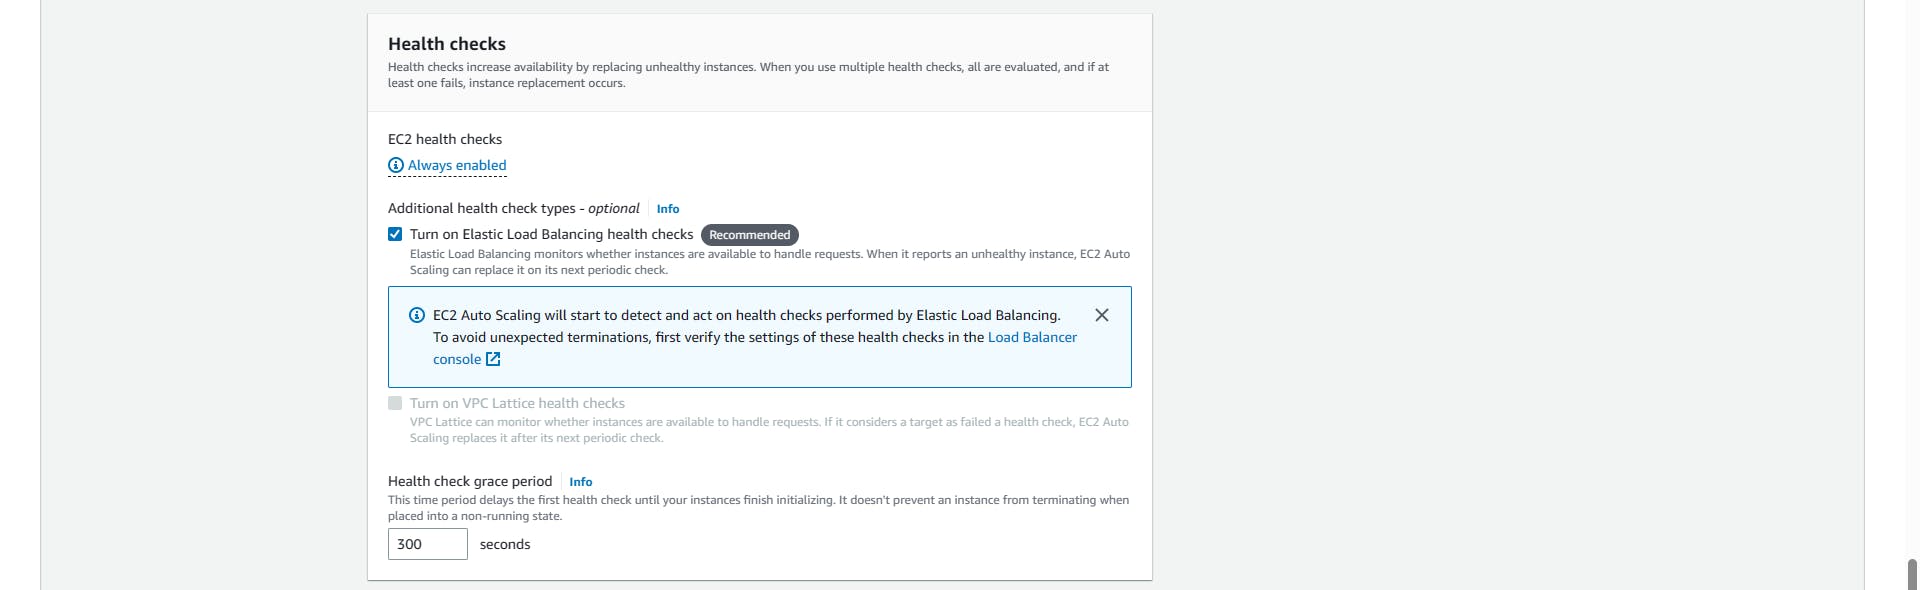
Health checks: Enable load-balancing health checks
Next
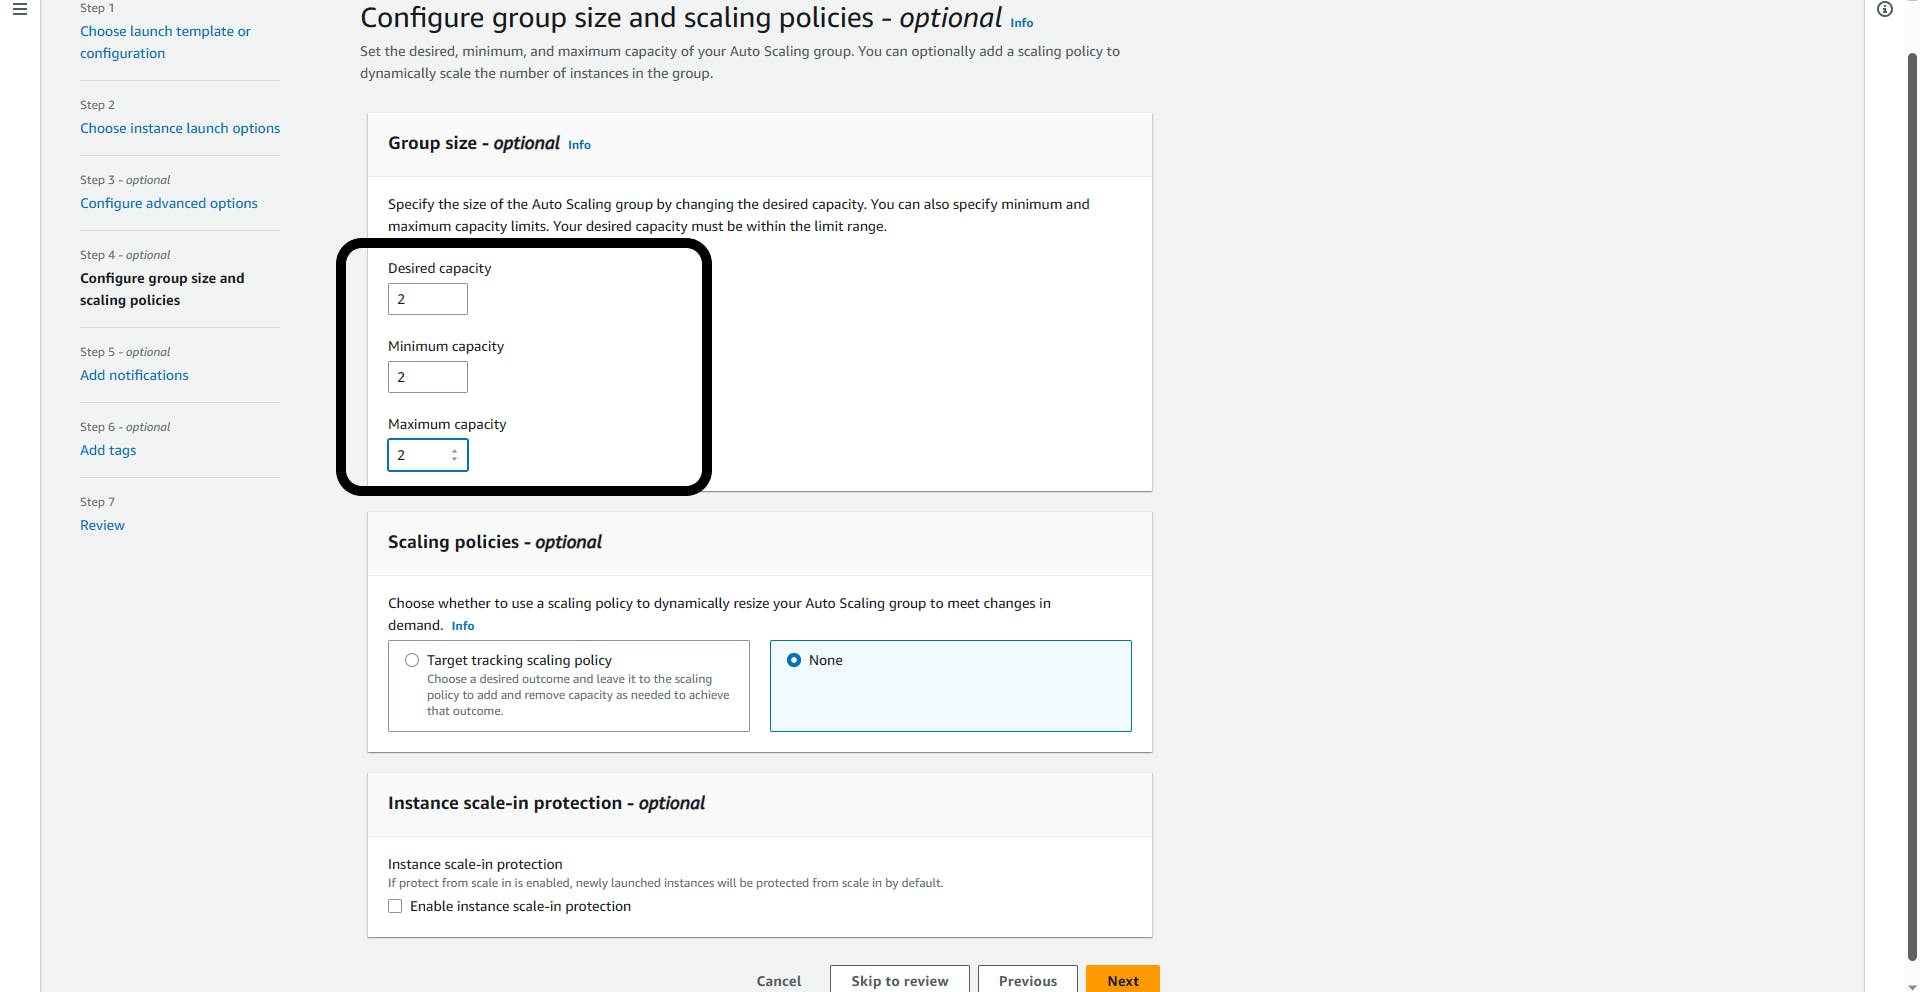
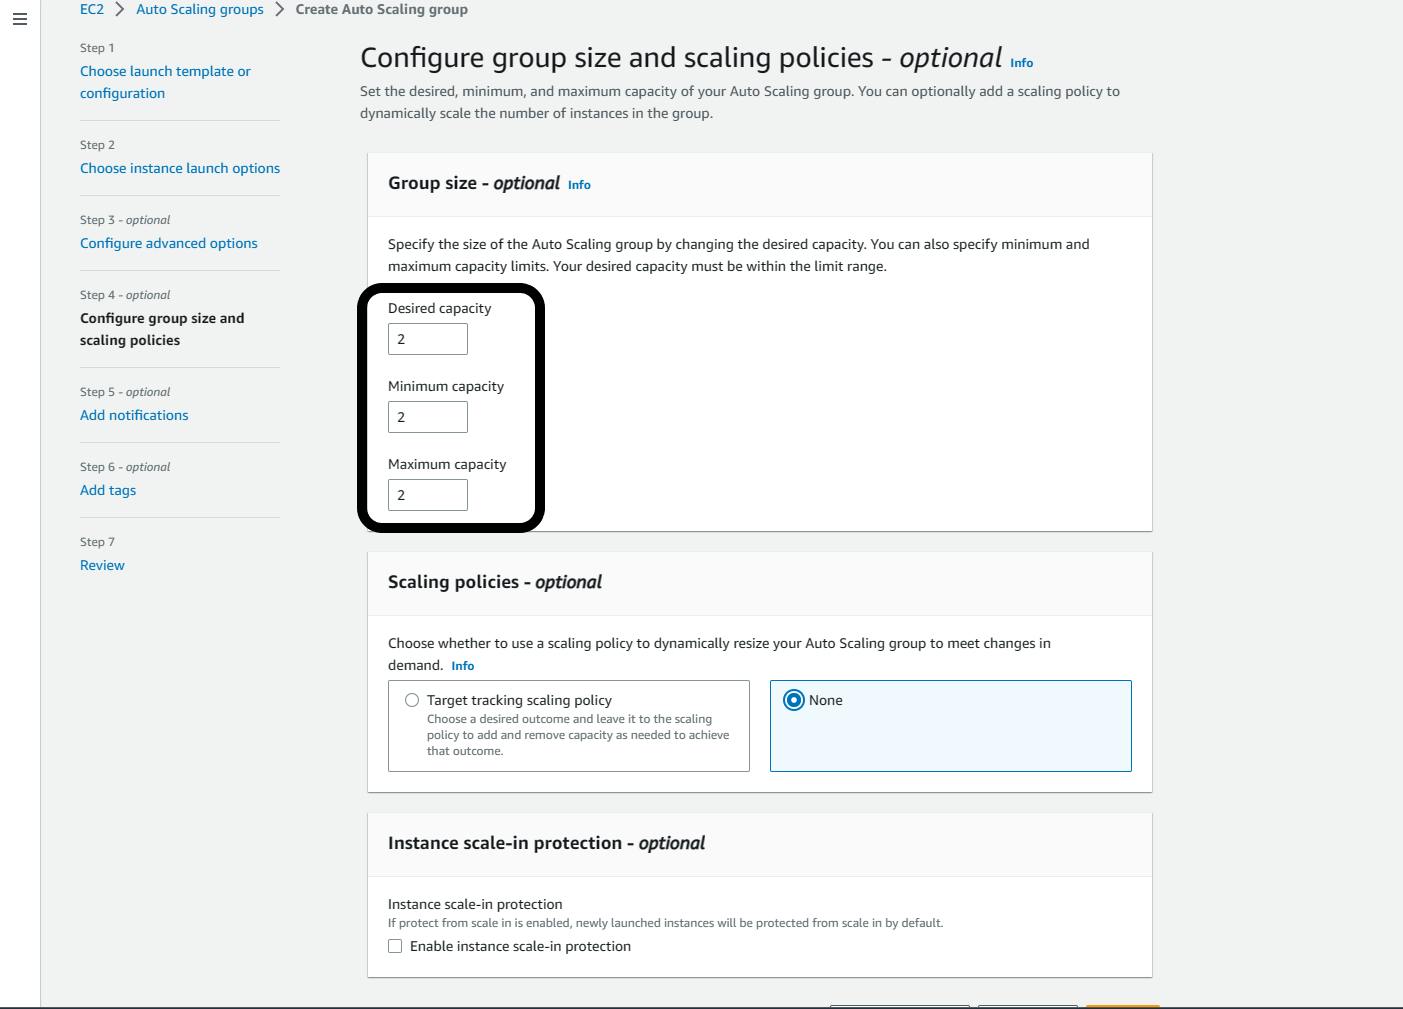
Group size:
- Desired =>2; Minimum =>2; Maximum =>2 (This where you decide how many EC2 instance you want running at all time)
Click Next all through steps 5 and 6.
Review settings and Create Auto Scaling group.
Application Auto Scaling group
Repeating the same process, navigate to Auto Scaling Groups again, Create Auto Scaling group
Name: Application-ASG
Launch template: Select the Application-TL from the drop-down
Next

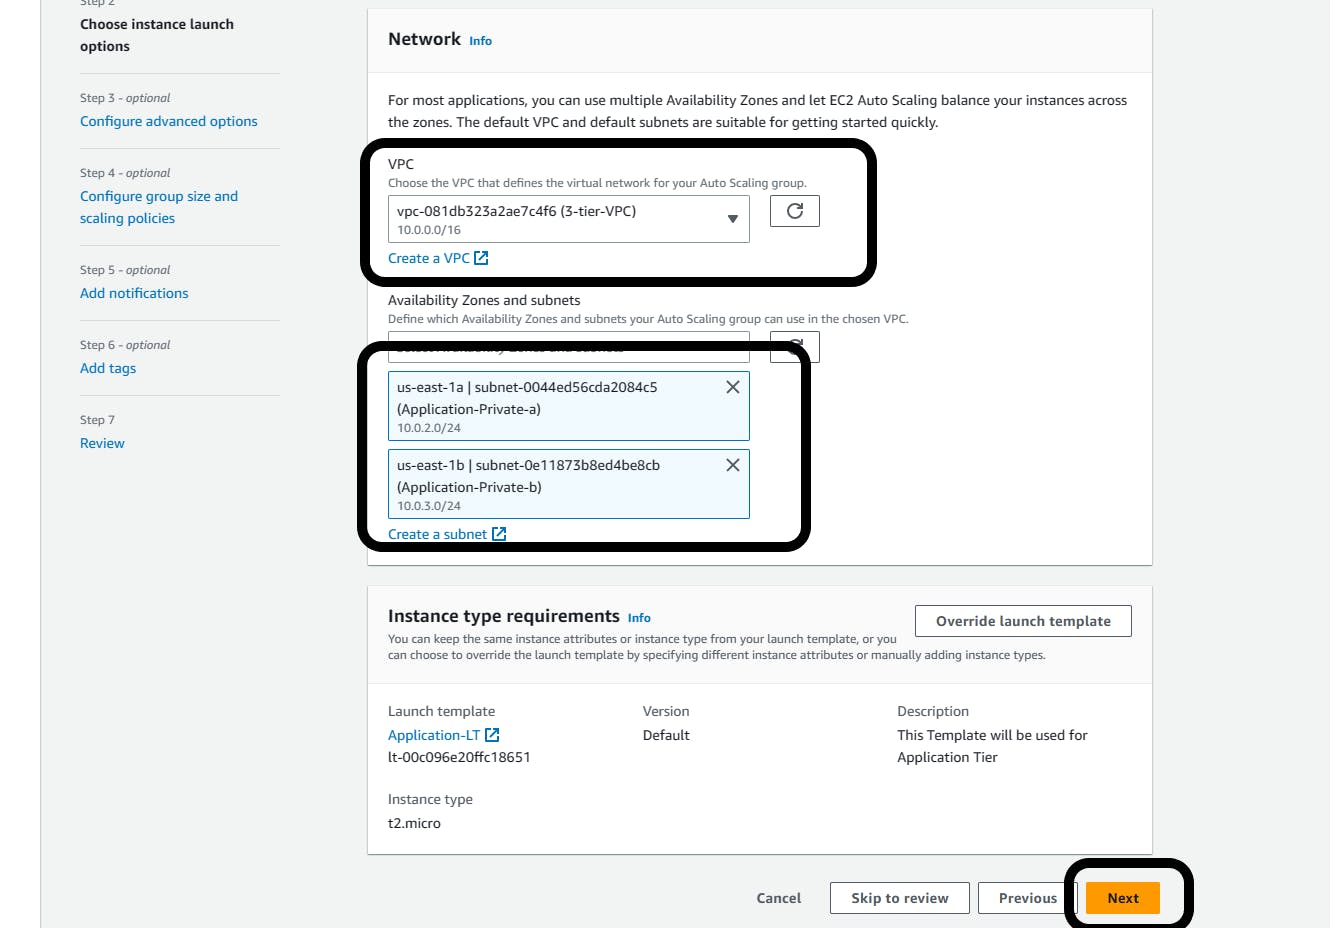
Network
VPC: Select your VPC from the drop-down (3-tier-VPC)
Availability Zones and Subnets: Select your two Web-Tiers
Application-Private-a and Application-Private-b
Next
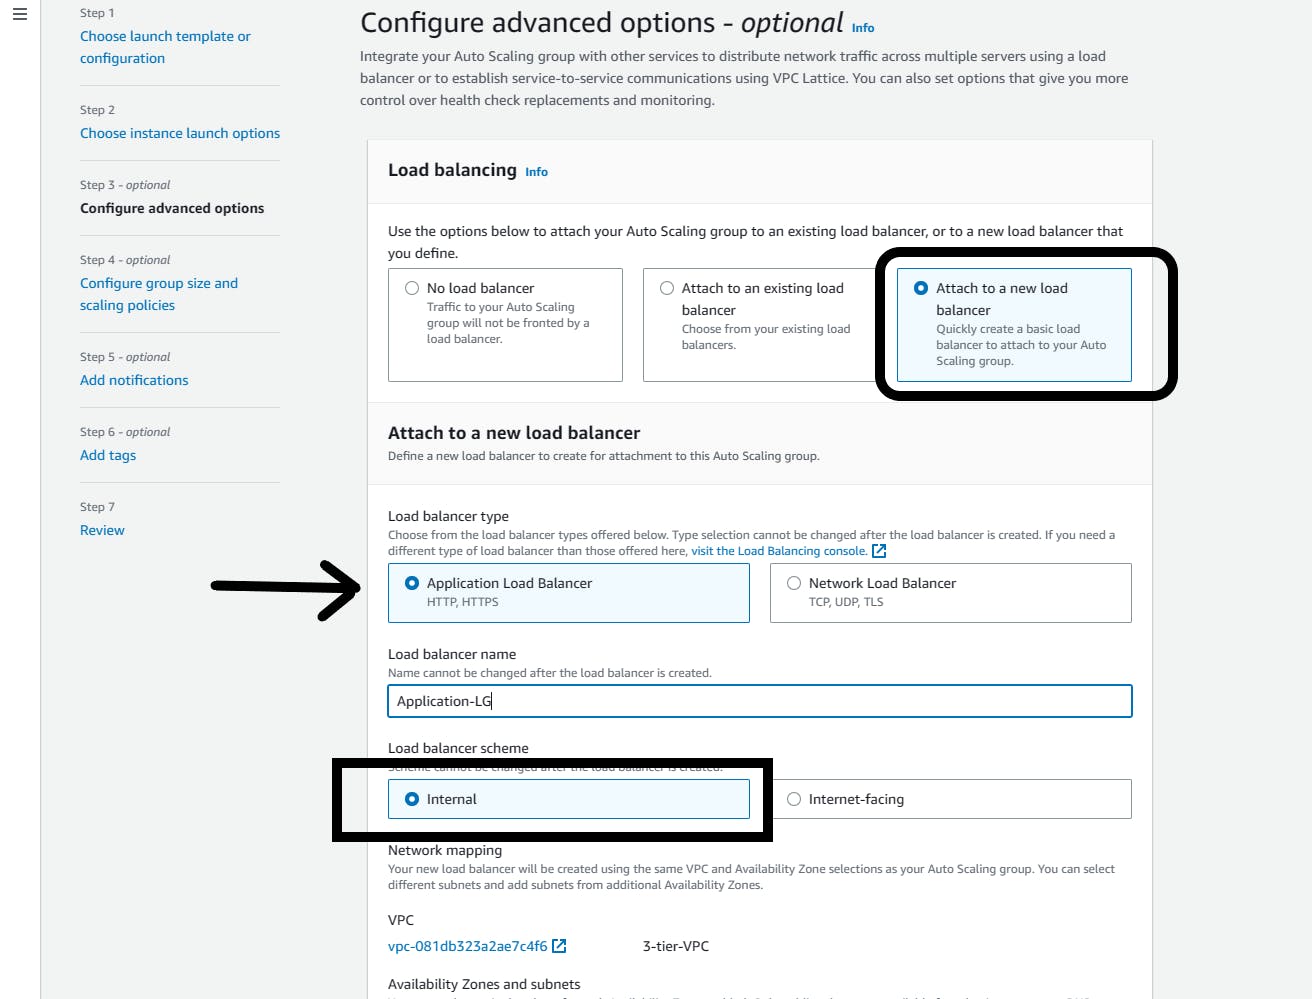
Load balancing; Attach to a new load balancer
Load balancer type: Application Load Balancer
Load balancer name: Application-LB
Load balancer scheme: Select=> Internal
Listeners and routing:
- Create a target group; Give it a name (Application-LG)
Health checks: Enable load-balancing health checks
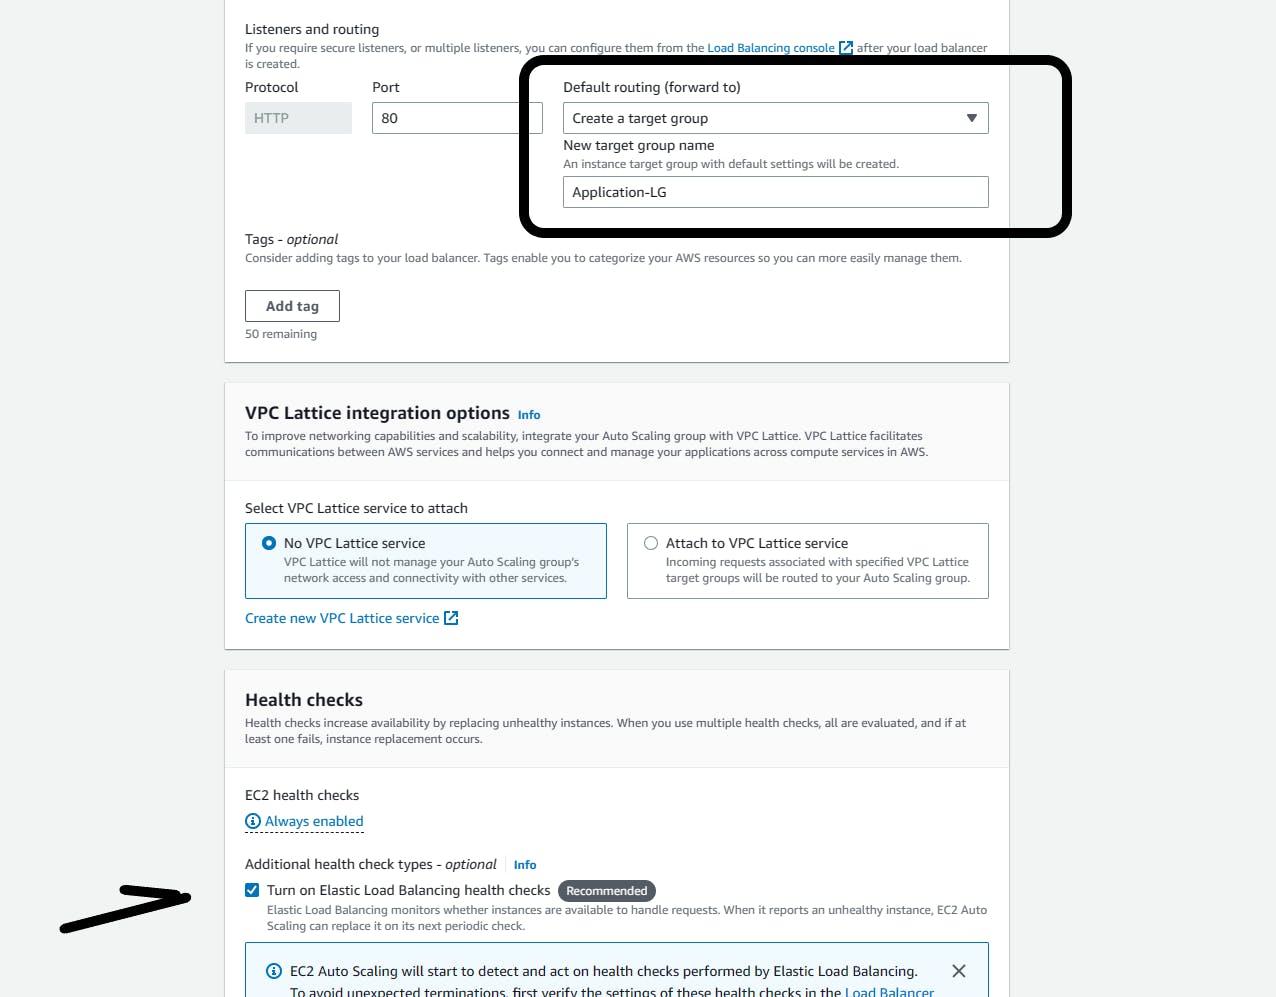
Next
Group size:
- Desired =>2; Minimum =>2; Maximum =>2 (This where you decide how many EC2 instance you want running at all time)
Note: In a real project, you need to set the Target tracking scaling policy for both Tiers. But we will leave it as none.
Next although steps 5 and 6
Review and Create.
You have done so well to get to this stage.
Testing the Load Balancer/Auto Scaling group
First, navigate to the EC2 console, you will see that 4 EC2 instance has been created (2 for Web tier, 2 for Application tier).
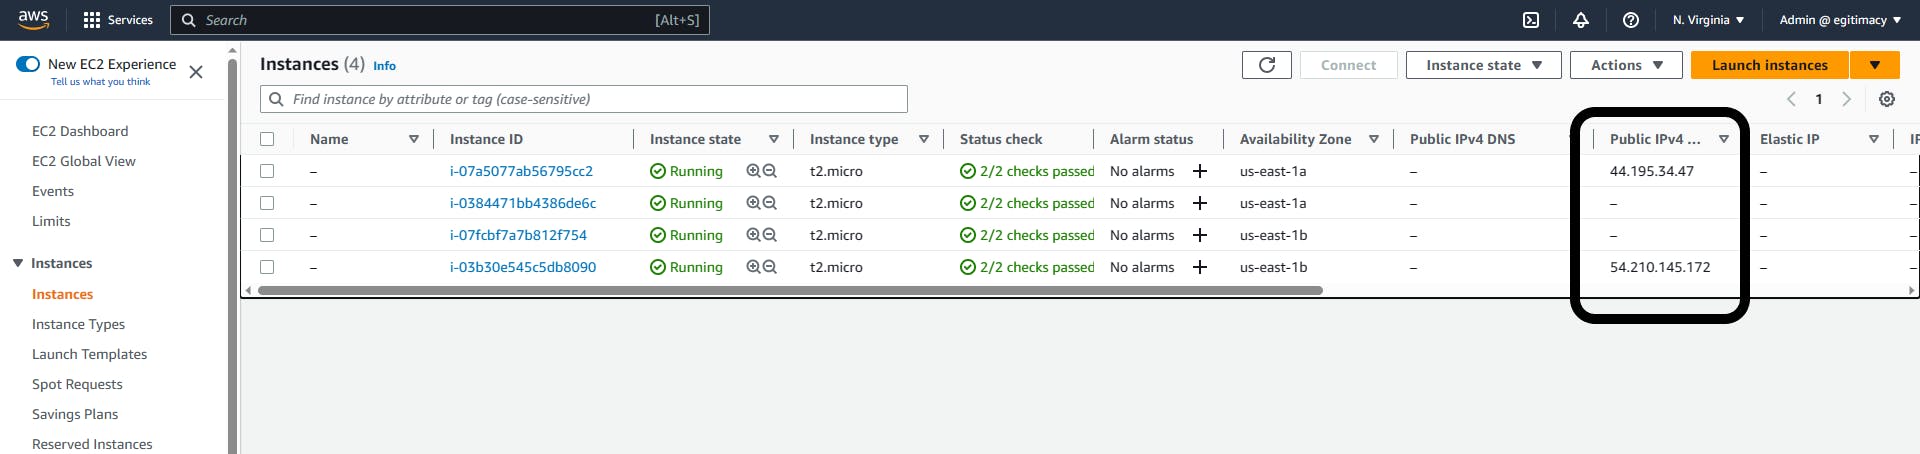
Note that only the Web Tier has public ipv4 attached to it. Input either of these numbers into your browser
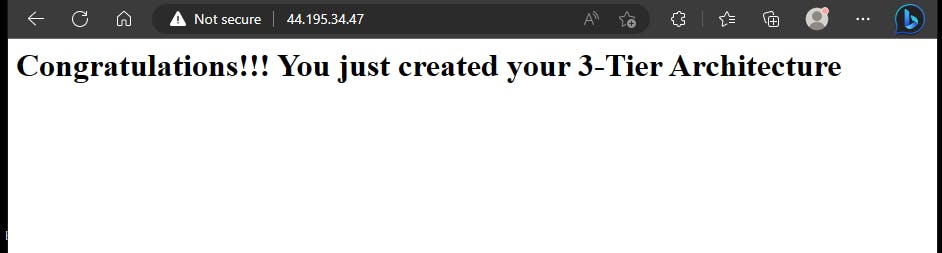
But remember that our Web Tier is fronted by an Application Load Balancer, let's check if we can access our web from it.
Navigate to the load balancer; Click on the Web-LB; Copy and paste the DNS name into your browser.
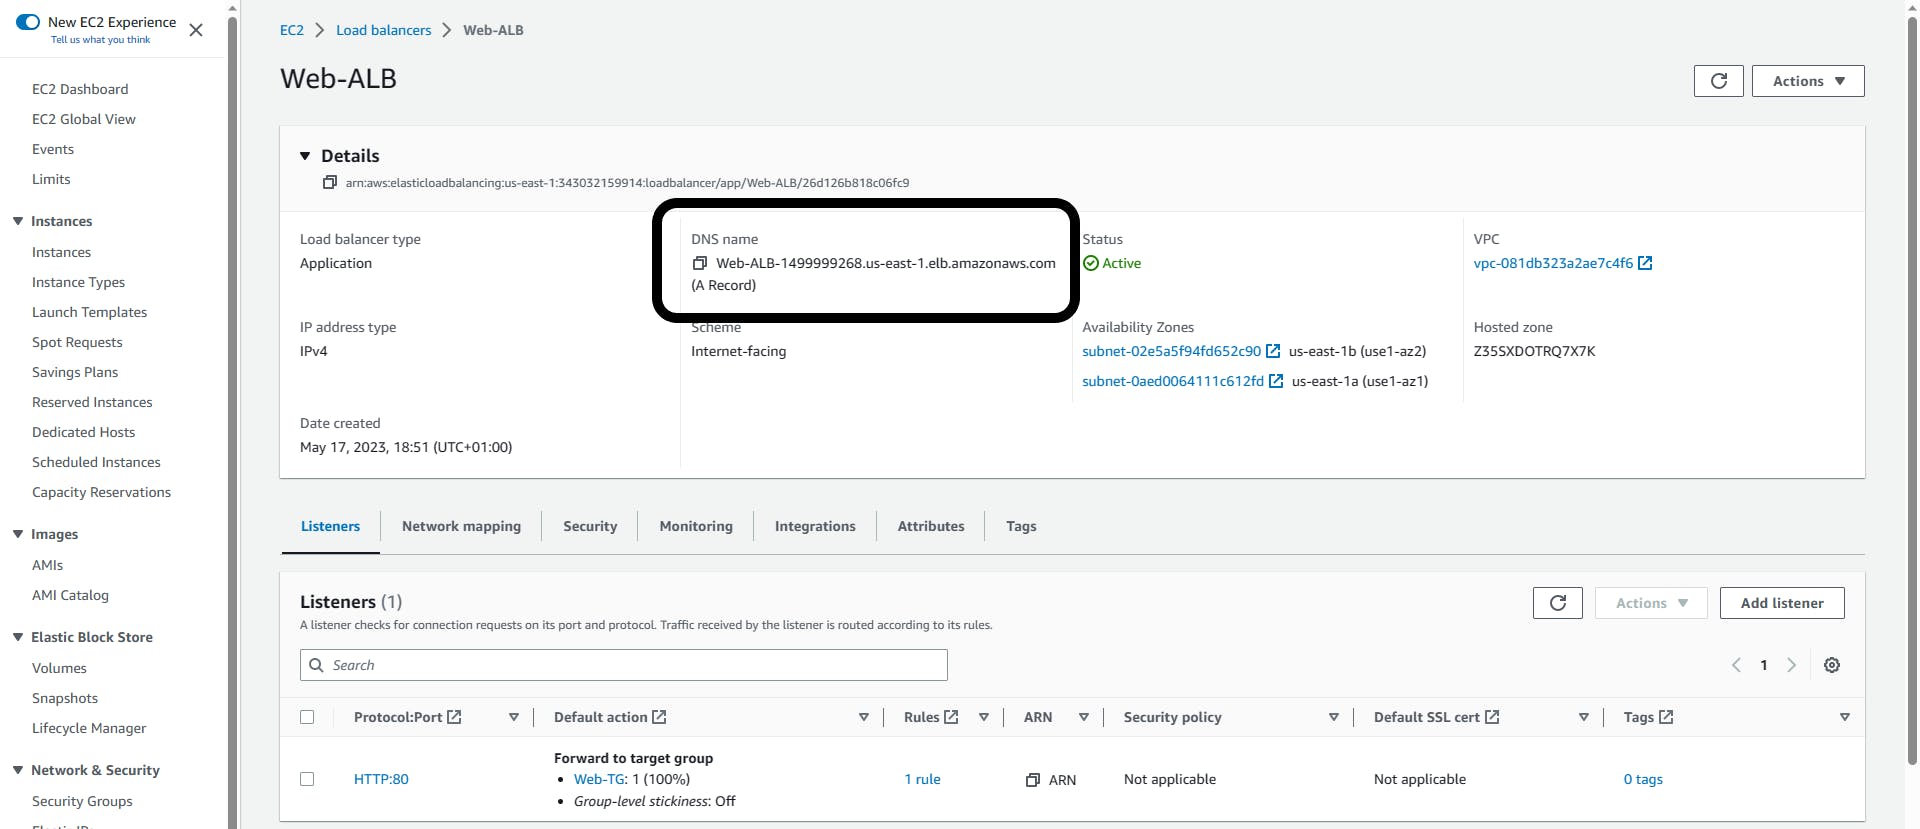
You will get the same thing. Great!!!

Stage 3
We have created every other thing except the database.
Database
The database enables you to store, manage, and retrieve structured or unstructured data in a scalable and reliable manner. AWS offers several database services designed to cater to different data storage and processing requirements.
RDS => MySQL is what will be used for this project.
Creating the Database
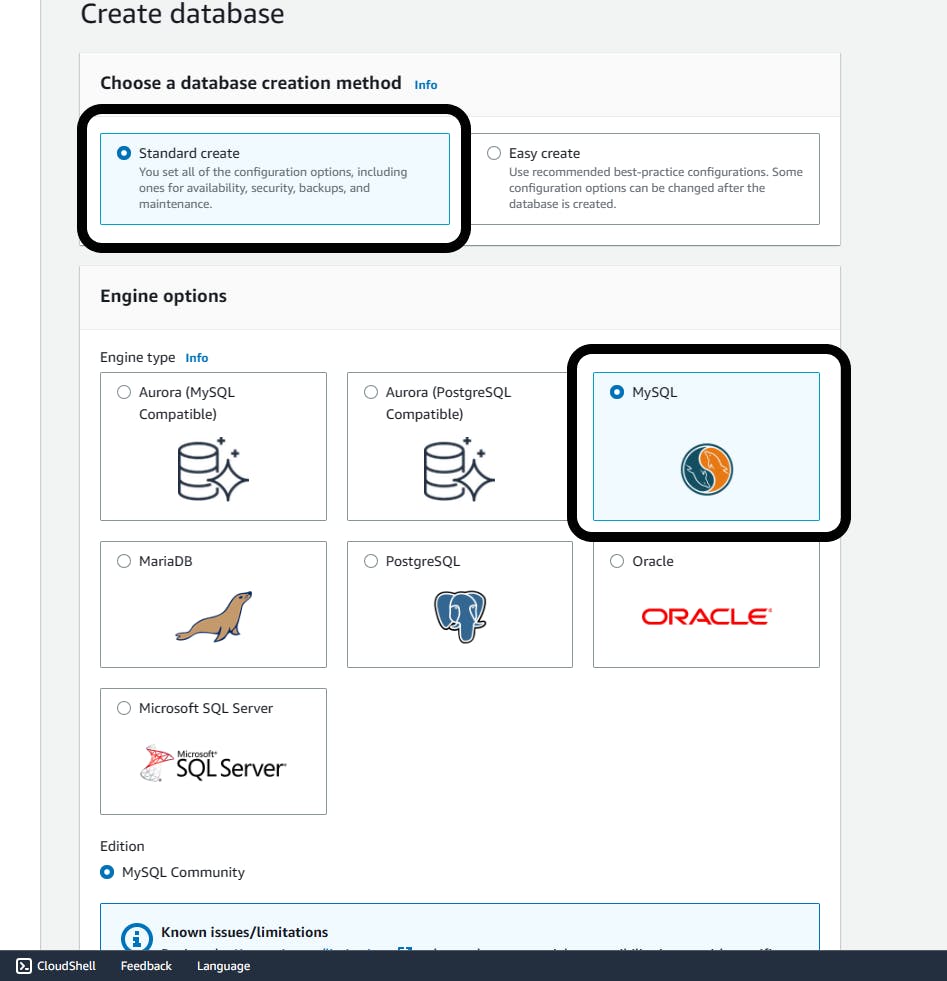
Search for RDS in the space bar; Click Create database
Select Standard Create
Engine options: MySQL
Settings:
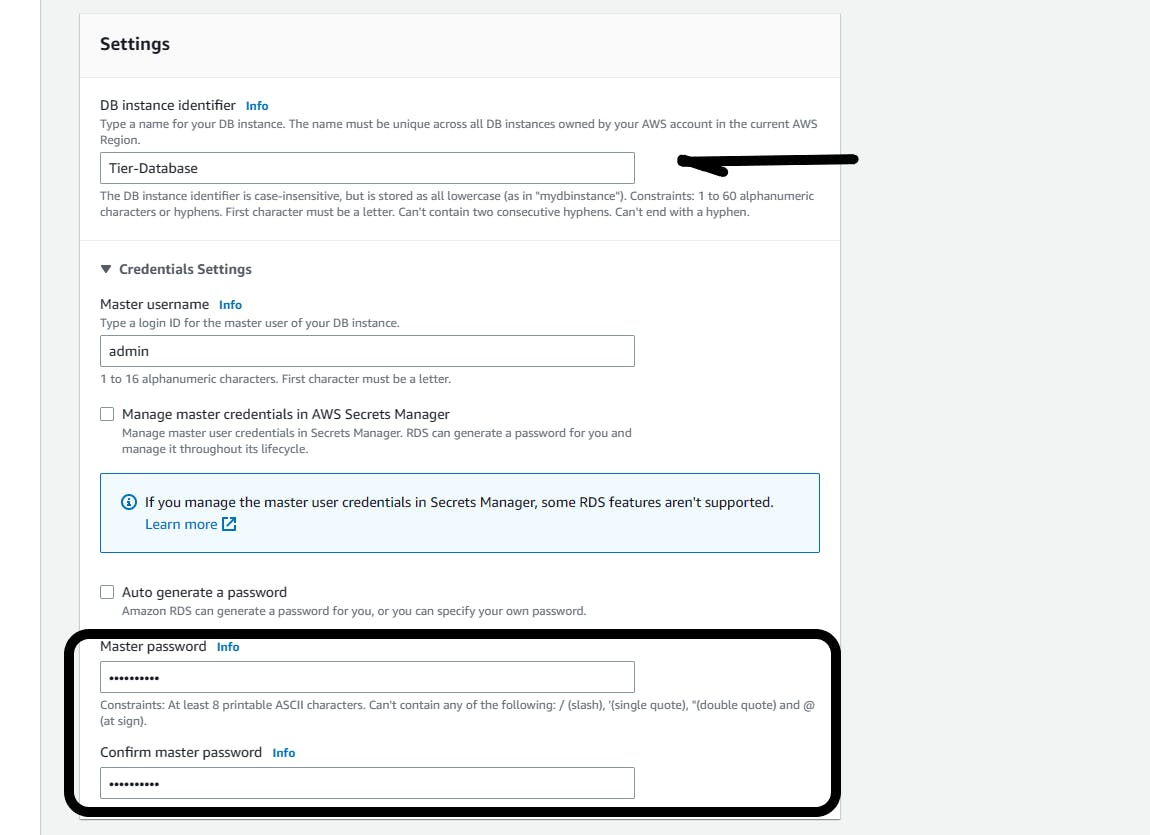
DB instance identifier: Tier-Database
Master username: Leave as it is (admin)
Add your password
Leave the storage as it is
Connectivity:
Virtual private cloud: Select your VPC from the drop-down (3-tier-VPC)
Create a new DB Subnet Group: Public access NO
VPC firewall: Create new
Name: Database-SG
Availability Zone: Choose one of the AZ you are deploying to(us-east-1a)

- Leave the rest as default and Create database
Navigate to Security groups, the database security group has been created
You need to edit the inbound rules to only accept traffic from the application layer security group (Private-SG).
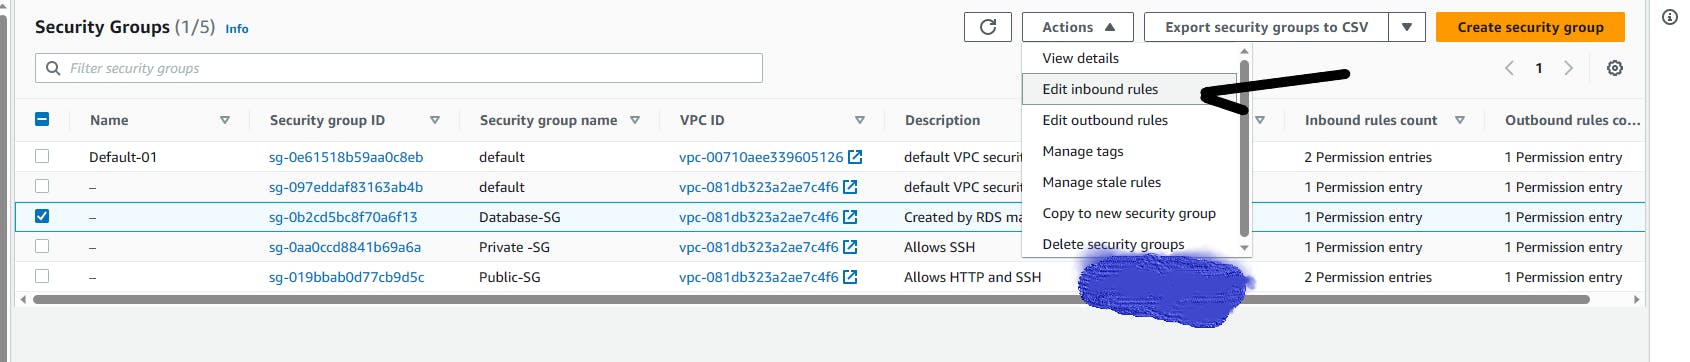
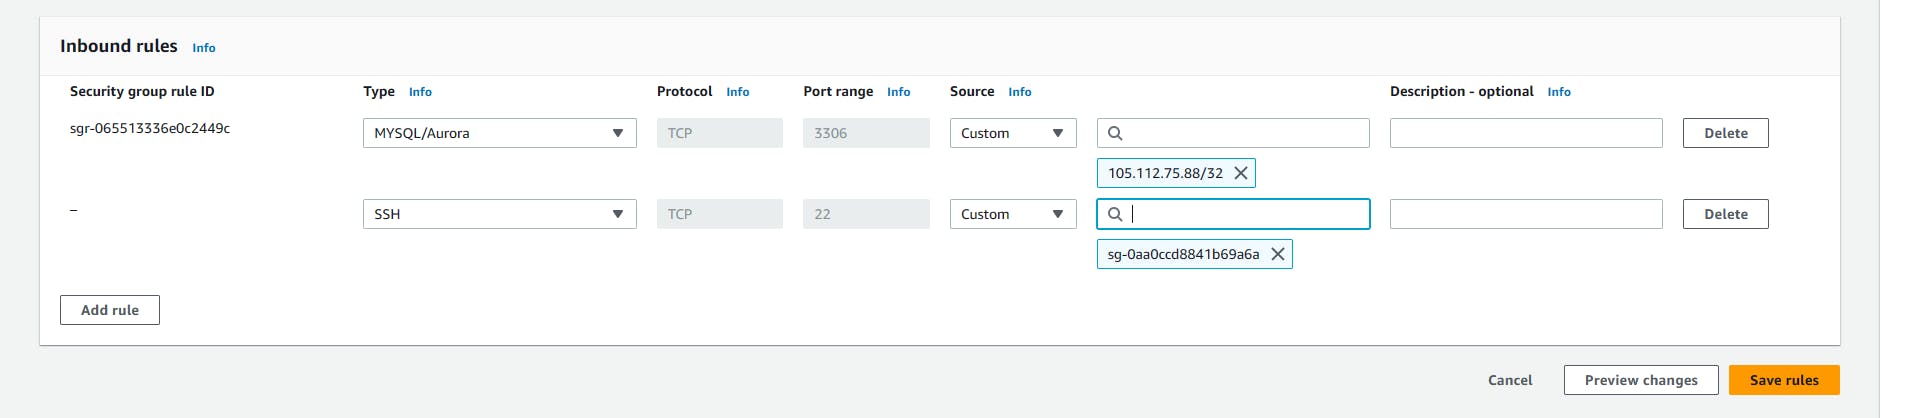
Edit and save the rule.
The way we can only get into the database from the application tier which enhances security.
Congratulations, you just created a 3-tier architecture. Phew, that was a lot of clicking and steps.
This Project requires a lot of patience, it's a fun project to include in your portfolio.
Deleting all resoucres
Delete Database
Delete Launch Template
Delete AutoScaling group
Delete NACL
Detach Network and delete
Delete KeyPairs
Delete Load Balancers
Delete Target groups
Delete Nat gateway
Release the Elastic IP
Disassociate Route table and delete route tables
Delete Subnets
Delete Security groups
Delete VPC
Run through that list again to be sure you didnt skip any
https://docs.aws.amazon.com/vpc/latest/userguide/what-is-amazon-vpc.html
https://docs.aws.amazon.com/vpc/latest/userguide/VPC_Route_Tables.html
Getting Started With VPC (Peering Connection, NACL) - Part Five (c-sharpcorner.com)